
Updated October 2022
Welcome to the Photoshop Bootcamp guide to getting started with Photoshop.
Photoshop is jam-packed with tools, panels, menus and options. It is no wonder then, many people feel overwhelmed when they are beginners
If you want to learn Photoshop, the best place to start is to learn about and understand the Photoshop workspace or interface. By becoming familiar with the workspace, you will be able to efficiently move around in Photoshop to open files, use tools, work with panels and customise the workspace.
If you don’t have a copy already, you can download a free Photoshop trial here.
(If you want to know more about buying a subscription for Photoshop, check out this post where I explain the different plans and how to get the best deal on Photoshop.)
Here’s what you’ll learn in this guide:
- Getting Around The Photoshop Workspace
- How To Open Files In Photoshop
- How To Use Tools And The Toolbar In Photoshop
- Photoshop Tools
- Free Photoshop Toolbar Cheatsheet
- Selection and Crop Tools
- Painting and Retouching Tools
- Vector drawing and Type Tools
- Navigation Tools
- Color Selection
- Quick Mask and Screen Mode
- How to use Tools and the Toolbar in Photoshop
- Photoshop Toolbar Shortcuts
- Hidden Tools
- Moving The Toolbar
- Picking Colors
- The Photoshop Info Panel & Tools
- How To Zoom And Pan In Photoshop
- How To Use Panels And Customise Your Workspace In Photoshop
- Panels and Menus
- Hide All The Panels In One Go
- How To Rearrange Panels
- Make A Panel Appear At The Front Of A Group
- Move A Panel Out of a Group
- Move A Panel from One Group to Another
- Collapse A Panel or Group Of Panels
- Resize A Panel Or Panel Group
- Panel Menus
- Where to find all the panels In Photoshop
- Close a Panel
- Try It Out Yourself:
- Sign Up For The Photoshop Bootcamp Newsletter And Get A Free Toolbar Cheatsheet
The screengrabs in this tutorial are from Photoshop CC 2020. However, the interface and workspace haven’t changed much between versions. So even if you have an older or newer version of Photoshop, this is all still relevant.
To get started open ANY image in Photoshop by choosing File > Open and pick any image you want from your computer or hard drive.
Getting Around The Photoshop Workspace
In this section, you’ll learn about the different parts of the Photoshop Interface. This will help you learn everything else in Photoshop more quickly because you will understand how tools, panels and menus work.
Meet the Workspace
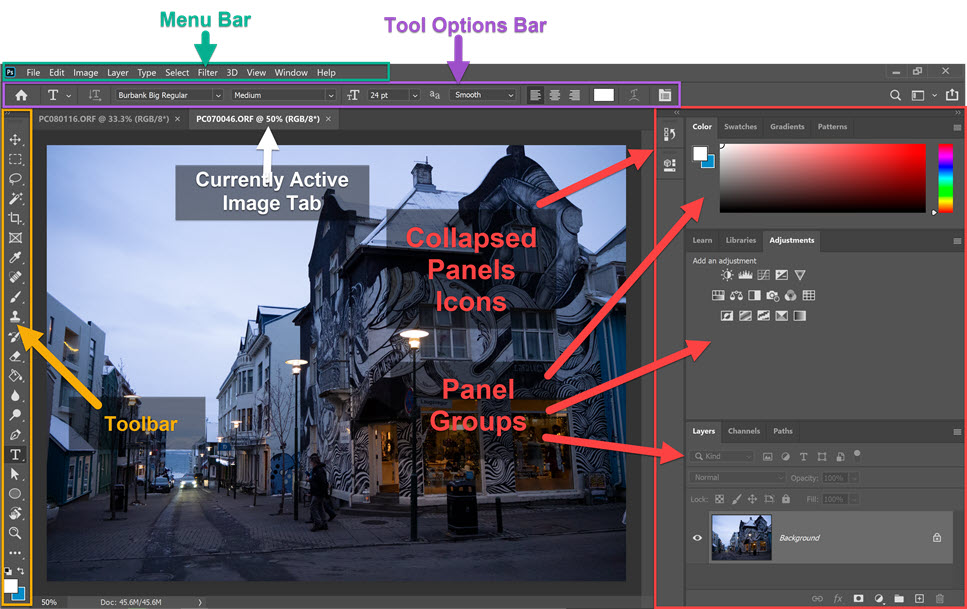
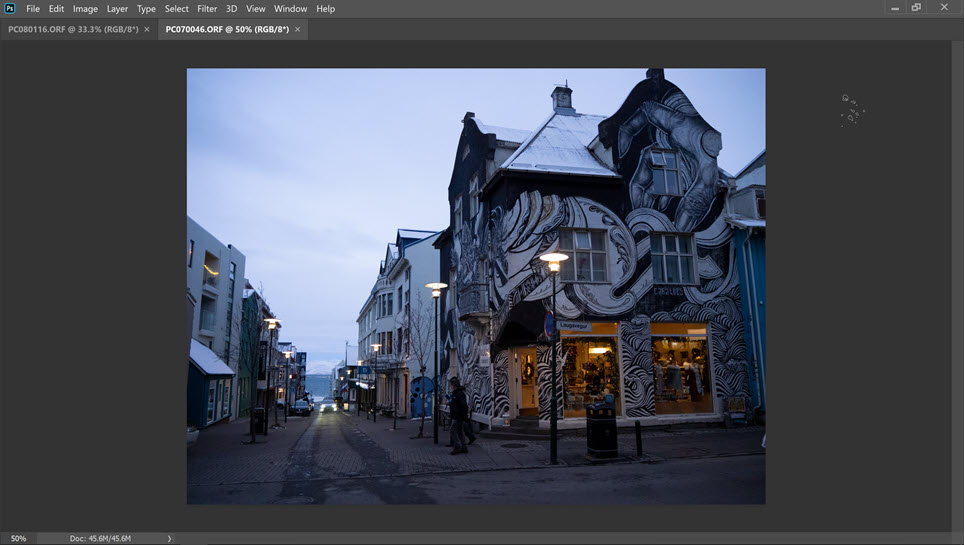
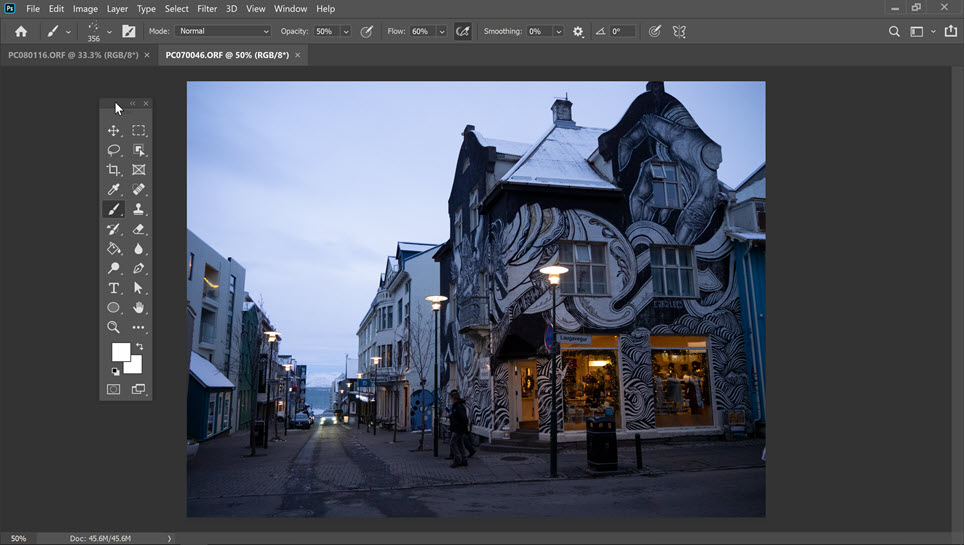
When you open Photoshop, it should look a little bit like this. Yours might look slightly different, but it should be fairly similar.
Your opened image sits in the document window and you can open multiple images in Photoshop at one time. In the example above, I have two images open and I move between them by clicking on the name tab.
Menu Bar
The menu bar always sits at the top of the screen. There are 11 menus with many options underneath each.
Click on each menu item to see what’s available. You’ll notice some options are greyed out which means they are not currently available.
This will vary depending on what you are doing. For example, if you have an area of an image selected, you will see most of the menu items under Select are available. However, if there is nothing selected, most of these will be greyed out.
For example, below you can see the contents of the Filter menu. This has several sub-menu items - 3D, Blur, Distort and Sharpen to name a few. Each one of those items has its own sub-menu.
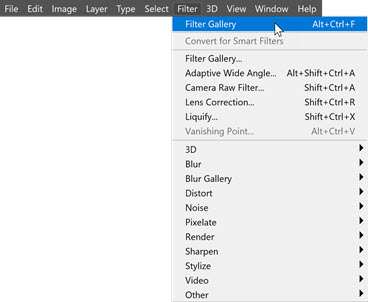
As you can see there are many commands available under the menu bar.
Tool Options Bar
As the name suggests, this bar gives us options or settings that we can apply to whichever tool we are currently using. The options are context-sensitive, so for example, if you are using the Type tool the options which appear in this bar will be exclusive to Type. If you are using the Paintbrush tool, you will see options only for controlling the Paintbrush.

Photoshop Toolbar
The toolbar sits on the left-hand side of the workspace and it holds the tools we use to create, edit, and manipulate our images.
We can move it freely around and can view it as a long, skinny, single-column toolbar, or as a wider, shorter, double-column toolbar.
We’ll look at the Toolbar and tools in more detail shortly.

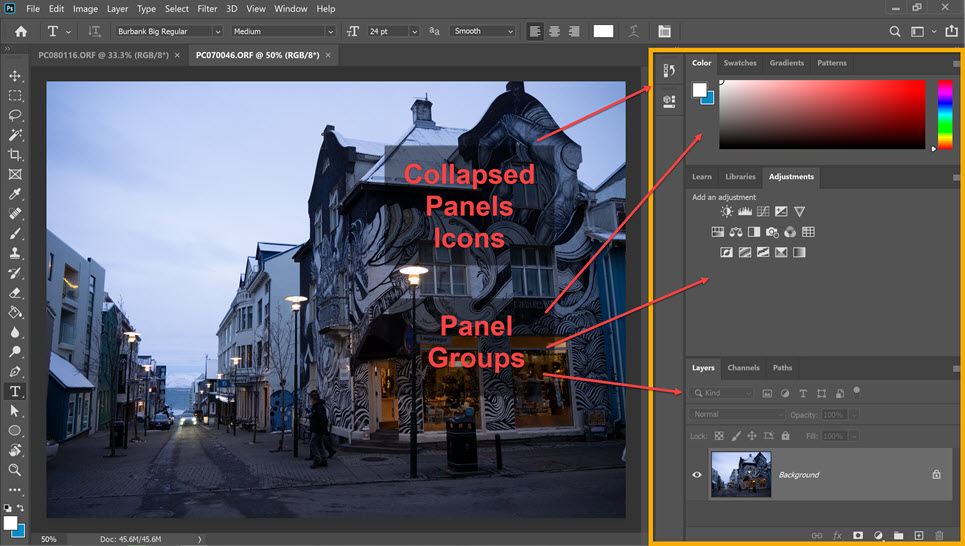
Photoshop Panels
Panels sit on the right-hand side of the screen, and like the toolbar, they can be dragged out and moved freely around the workspace. They provide lots of extra functionality.
We’ll look at how to use and organise the panels in a section below.

How To Open Files In Photoshop
There is nearly always more than one way to do things in Photoshop.
This holds true for opening files. In this section you’ll learn a few different ways to open up your images and photos.
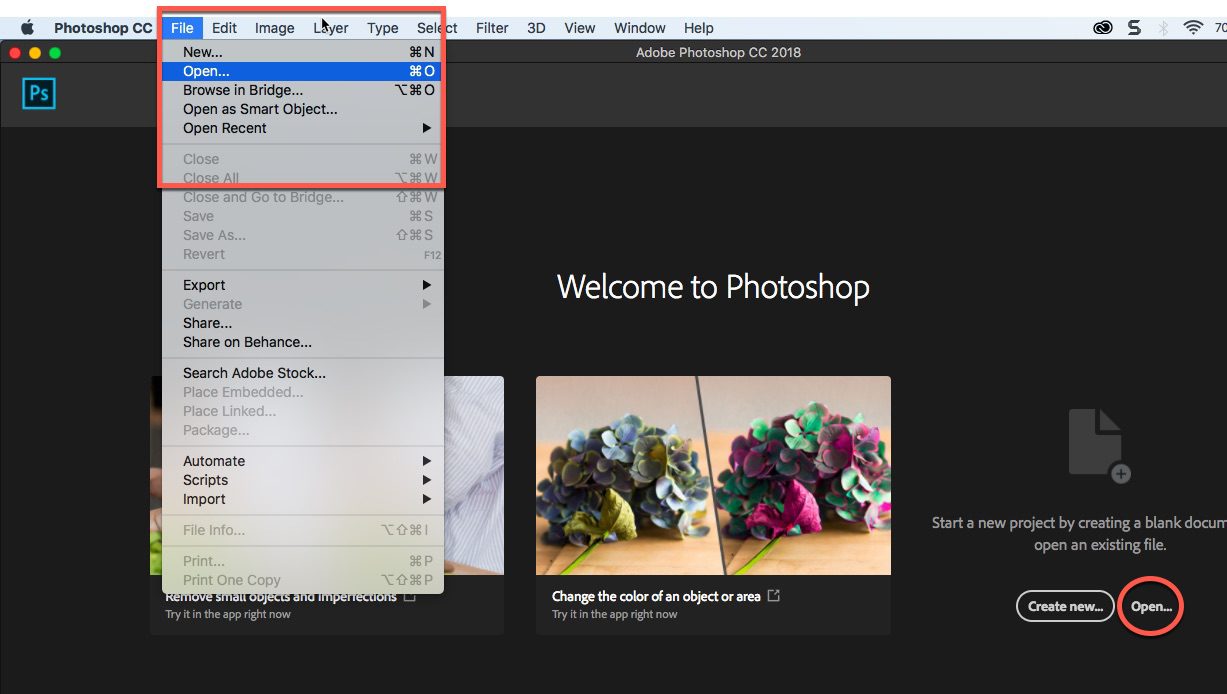
1 Choose File > Open from the menu at the top of the screen. You can also use the keyboard shortcut Cmd + O (Mac) or Ctrl + O (Win)
OR
2 From the Home Screen, click on the Open… button on the left-hand side.
Whichever way you choose, it will open a dialog where you can browse to find your file.
Click on the file name and click Open.
How To Open A Recent File In Photoshop
If you’ve already been working on some images or photos in Photoshop, those files are considered to be “Recent” files and you can open them quickly in two ways:
1 Choose File > Open Recent, and select a file from the submenu that pops out
OR
2 On the Home/Start screen, simply click on the thumbnails of Recent files that appear there.
How To Create A New Document In Photoshop
When you’re creating a new document (image) in Photoshop you need to consider how the file might be used.
Will the image be printed in a magazine or book? Will it be used as a graphic on a website or screen?
In this section, you’ll learn how to start a new file from scratch and how to use starter templates.
When you’re ready to start creating your own artwork and graphics from scratch, you create a New document in Photoshop. Follow along in this step-by-step tutorial and I’ll explain how to create a file for use on the web or for use in print.
To create a new document in Photoshop, we use the New Document dialog box. There are several ways to get to this dialog box.
1. Click File > New on the Menu Bar at the top of the screen.
OR
2. Use the keyboard shortcut, Cmd + N (Mac) / Ctrl + N (Win). This is a handy keyboard shortcut that we use over and over when working in Photoshop, so it’s worth making an effort to remember it.
OR
3. From Photoshop’s Home or Start screen, Click on the New… button on Photoshop’s Start screen. (Again your screen may look slightly different, depending on how many files you have opened previously, but it should look something like this.)

Any of these options open up the New Document dialog box.

What’s In The New Document Dialog Box in Photoshop?
Along the top of the New Document dialog box, you’ll see a row of categories – Recent, Saved, Photo, Print, Art & Illustration, Web, Mobile, and Film & Video.
By default, the Recent category is selected and you will see a grid of document sizes that you’ve used recently. If this is the first time you’ve opened Photoshop, or if you have reset Photoshop to factory settings, there will be nothing in this category.
How To Create A New Document In Photoshop Using Presets
A handy time-saver when creating new files is to use a preset. A preset is simply a setting of width and height dimensions, a choice of portrait or landscape orientation, resolution and colour mode. There are other options but these tend to be the ones we are most likely to be interested in.
1. To choose a preset, first, pick the type of document you want to make, for example, is it for use on the web or on a screen, for use in print, a photo? Click on that category name along the top. For this example, I’ve chosen Print.
2. A set of four presets appear in the dialog box. Click on the View All Presets + link to see more presets.
Now we can see an extra bunch of thumbnails representing various Print presets. Use the scroll bar along the right to scroll through them.

3. Click on the A5 preset. Notice how the Preset Details such as width and height change on the right-hand side.
4. If you’re happy with this preset, click Create. The New Document dialog box closes and your brand new document opens in Photoshop.

How To Create A New Document In Photoshop With Your Own Custom Settings
Let’s say that you want to make a document at a size that is not already available as a preset. Here’s how to add your own custom settings.
1. Choose File > New in the Menu Bar along the top of the screen. The same New Document dialog opens as before.
2. On the right-hand side, in the Preset Details section, type in the values 10 inches for width, 3 inches for height and change the colour mode to CMYK. We change the units of measurement by clicking on the drop-down box to the right of the Width field.
Now, let’s say that we know this is a document size that we may want to use again, it’s a good idea to save it as a preset.

3. Click the Save Preset icon (circled in red).
4. Give it a name by typing in the Preset name field at the top. (It will say something like Untitled initially). Give it a descriptive name to make it easier for yourself to remember what the preset is. I called mine Jen – Banner – 10 x 3.
Then click Save Preset again.
The new saved preset now appears in the Saved category. This means you can come back to it at any time and it will speed up your workflow by not having to type in the values each time you want a document of that size.
5. Click on the Create button and your new file opens in Photoshop.
And that’s how you make a new document in Photoshop. Note: You DO NOT have to save your preset every time.
Practice: Try creating some new files
1. Make a new Photoshop document suitable for web use (hint: color mode will be RGB and Resolution will be 72 Pixels/Inch). Set the size to 1000 pixels wide by 1000 pixels high.
2. Make a new Photoshop document suitable for print use. (Hint: Color mode will be CMYK and Resolution will be 300 Pixels/Inch). Set the size to 8 inches wide by 10 inches high.
How To Use Tools And The Toolbar In Photoshop
OK, now we’re getting to the fun stuff. Just like an artist’s work table, the toolbar holds Photoshop tools.
In this section, you’ll learn how to select tools, find hidden tools, how to get tooltips and how each tool has specific options that you can set when using them, using the Options Bar.
Let’s start off by taking a closer look at what’s actually in the toolbar.
Photoshop Tools
It is the long, narrow palette on the far left side of the work area contains the tools you’ll use to draw, paint, erase, and do tons of other things whilst working on your image.
The tools can be broken into several distinct categories. This will help you find them when you know what kind of tool you need. The illustrations below show an overview of the toolbox, with each tool available and its shortcut key.
I strongly encourage you to start making a mental note of the shortcuts. It’s one of the best ways to speed up your workflow in Photoshop.
Selection and Crop Tools
Painting and Retouching Tools
Vector drawing and Type Tools
Navigation Tools
Color Selection
Quick Mask and Screen Mode
How to use Tools and the Toolbar in Photoshop
When you hover your mouse over any tool in the toolbar, a tooltip appears showing you the name of the tool and the tool’s keyboard shortcut. This is very handy when you forget what a certain tool looks like when you’re learning Photoshop.
To select a tool, simply click on that tool in the Toolbar.
Photoshop Toolbar Shortcuts
It’s worth making a conscious effort to learn the shortcuts as it speeds up your work enormously. Some of the shortcuts are really easy to remember such as Z for the Zoom tool or E for the Eraser.
So instead of clicking on the tool in the Toolbar, just press the letter on the keyboard. This will dramatically speed up your workflow as it lets you change tools without taking your hands off the keyboard.
Hidden Tools
Wherever you see a little arrow on the bottom right of a tool in the Photoshop toolbar (or any Adobe application for that matter), it means there are other “hidden” tool choices.
Hidden tools are accessed by clicking and holding on that tool. As you hold, a fly-out set of tools will appear giving you access to all of the hidden tools under that particular tool.
In the example below, you can see that by clicking and holding on the Magic Wand tool, the hidden Quick selection Tool becomes available.
To quickly cycle through hidden tools, hold down the Shift key and tap the tool’s keyboard shortcut that appears in the tooltips.
For example, to cycle through the Brush, Pencil, Color Replacement, and Mixer Brush tools, you would press B to select the first tool and then hold down Shift and press B again to move through that particular set of tools.
Moving The Toolbar
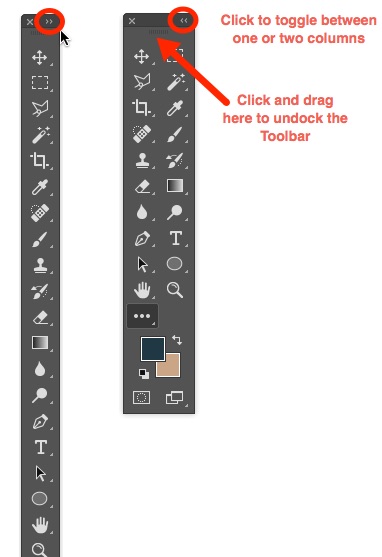
You can change the Toolbar from a single column to a two-column panel, by clicking once on the double arrow button in the top-right corner. To switch back again, simply click the double-arrow button again.
If you want to float the Toolbar anywhere on your screen, drag it away from the left-hand screen edge. Drag it by clicking the tiny row of vertical dashes near its top. It is now a “floating” panel and you can drag it anywhere you want as you work.
To dock it back to the edge of the screen, drag the panel all the way to the edge until a blue vertical bar appears against the edge of the screen. The blue bar is an indication to let go and the panel will snap into place and is once again docked.
Picking Colors
Near the bottom of the Toolbar, you can see the Foreground and Background Color Swatches (sometimes called color chips). By default the foreground is black and the background is white. Photoshop uses the foreground color when you paint or fill an area with color.
The background color is used as a second color when you create a gradient and when you erase parts of a locked Background layer amongst other things.
To change a color, click on its color swatch once to open the Color Picker. From here you can choose from millions of colors.
To swap your foreground and background colors, click the round double-headed arrow just above the foreground and background swatches or press X on the keyboard.
To set both color swatches back to their default factory setting of black and white, click the miniature swatches or press D.
The last two items on the Photoshop Toolbar are the Quick Mask mode and the Screen Mode Buttons.
The Photoshop Info Panel & Tools
Another useful panel that you can use when you’re learning about Photoshop tools is the Info panel. This gives further hints about how to use any particular tool.
Choose Window > Info if the Info panel is not already open. If you don’t see a tip at the bottom of the panel then go to the Info panel menu and choose Panel options, from there click on the checkbox for Show Tool Hints.
How To Zoom And Pan In Photoshop
When you are getting started with Photoshop, you may not be aware of the ability to zoom in and out on your images. One of the joys of working in Photoshop is the ability to zoom RIGHT in on your work to see it more closely. And vice versa, zoom right out to get an overview.
In this section, you’ll learn how to use the Zoom tools to increase and decrease magnification.
You’ll also learn how to Pan around an image when you’re zoomed in and how to use the Navigator panel.
Zooming In Photoshop
Using the Zoom Tool, we can reduce or enlarge our view. The quickest way to Zoom In to an image is to press the keyboard shortcut Ctrl + (plus symbol) in Windows or Cmd + (plus symbol) on the Mac. To Zoom Out, press Ctrl – (minus symbol) or Cmd – (minus symbol).
Follow along and you’ll learn other ways to zoom, pan and use the Navigator panel effectively.
How To Use The Zoom Tool In Photoshop
1. Open an image in Photoshop using File > Open and browse for your image.
2. When your image opens in Photoshop, take a look at the status bar at the bottom of the image window. This tells us the current zoom level of the image. The zoom level also appears in the image tab.
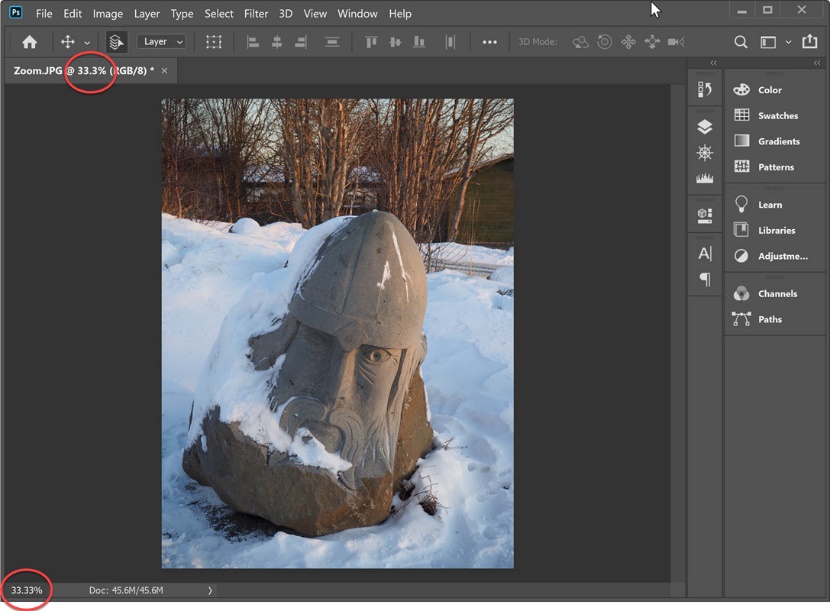
3. Select the Zoom Tool from the toolbar, or press Z on your keyboard. ![]()
Note: You will use the Zoom tool a LOT. Try to remember Z for Zoom as a shortcut.
Zoom In
4. Move the cursor over your image. The cursor changes so that it looks like a little magnifying glass with (+) in the center. ![]()
Click once anywhere on your image.

The image enlarges, and a new zoom level appears in the status bar and on the image tab.
The area where you clicked with the Zoom tool becomes the centre of the enlarged view.

Keep clicking until the image is magnified up to a maximum of 12,800%.
At this level, you can see the individual pixels that make up the image.

Zoom Out
5. Hold down the Alt key (Windows) or Option key (Mac).
The Zoom tool magnifying glass appears with a minus sign (–) in the centre and then click anywhere in the image.
The view now zooms out to a lower magnification.
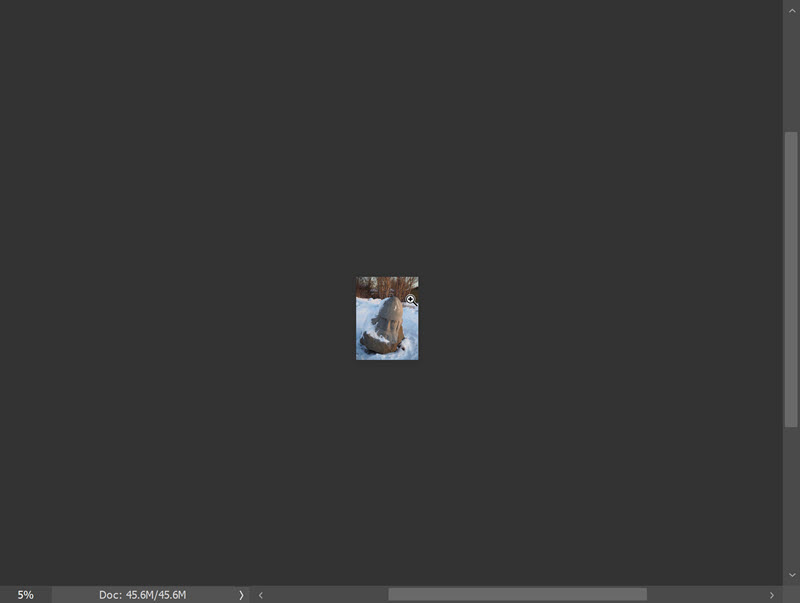
- Zoom out again by holding down the Alt key (Windows) or Option key (Mac) and continue to click until you have zoomed out to 0.06% of the image’s actual size.
Zoom Tool Tip: To quickly get back to 100% magnification, double-click the Zoom tool on the toolbox.
Zooming into a specific part of the image
With the Zoom tool selected, on the Options bar at the top, make sure that “Click and move left or right to zoom” is not turned on. This button is also known as the “scrubby” Zoom. For now, we’ll leave it off.
![]()
Click and drag a rectangle around an area in your photograph. You will see dotted lines forming the rectangle shape as you drag.

When you have dragged the rectangle to the size you want, let go of the mouse button. The image is magnified so that the area you enclosed in the rectangle now fills the entire image window.
Using the “Scrubby” Zoom.
With the Zoom tool still selected, on the Options bar at the top, click on the “Click and move left or right to zoom” button.

Click and drag to the left, the magnification level is reduced i.e. zoomed out.
Click and drag to the right, the magnification level is increased. i.e. zoomed out.
How to use the Hand tool to pan in Photoshop
The hand tool lets you pan or move around your image. It feels almost as if you are pushing a photograph around on your desk. The Hand tool sits in the toolbar and can be selected by clicking on it. However, the easiest way to use it is simply to press the space bar on the keyboard. Here’s a quick demonstration of how to use it.
With an image open in Photoshop, zoom in using the Zoom tool (Z). ![]()
Select the Hand tool in the toolbar. ![]()
The cursor changes to a hand, then click and drag on your image to pan around the picture. You’ll see that your picture moves in the direction that you push it.
This is useful because it means we don’t have to zoom back out again to work on another part of the image. We can simply pan across to the part we want to see.
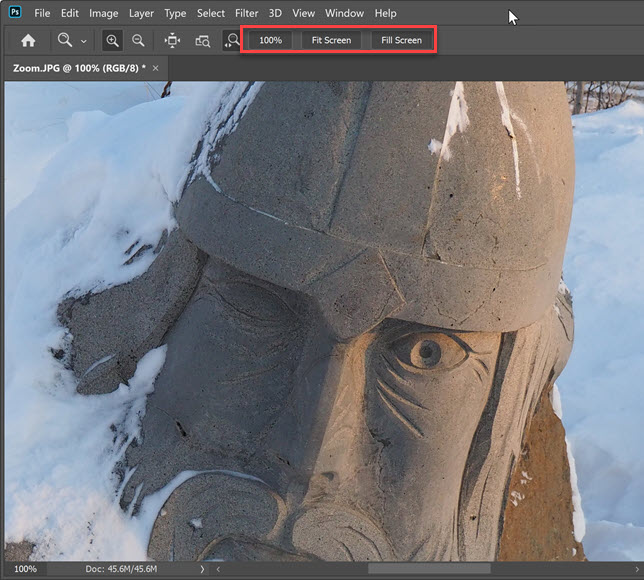
Notice that when the Hand tool is selected the options bar at the top shows 3 buttons: 100% (or actual pixels), Fit Screen and Fill Screen. These are options let you change the magnification level of your image while using the Hand.
Hand Tool Keyboard Shortcut
Select the zoom to again by pressing Z. Hold down the space bar and you will see the cursor changes to the Hand tool. Keep pressing the space bar on your keyboard and push your image around so you can see all parts of it.
Hand tool tip: Double click the hand tool in the toolbar to fit your whole image on your screen. This is the same as using Ctrl+0 (windows) Cmd+0.
Zooming and panning with the Navigator panel
The Navigator panel lets you change the view of your image using a thumbnail display. The red box in the Navigator represents the currently viewable area in the window.
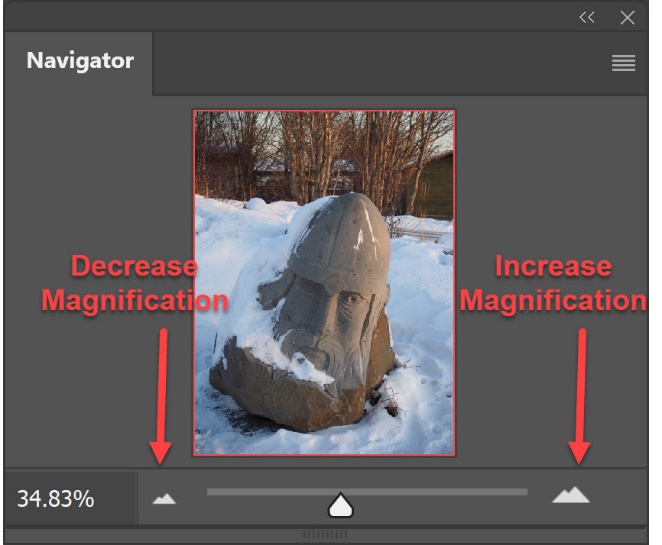
Drag the slider on the Navigator panel to the left and right to see how it affects your view of the image.
Drag the slider all the way to the right so that the image is enlarged to 3200%.

Put your cursor over the red rectangle in the Navigator panel and notice it changes to a hand icon. With the hand, drag the rectangle around in a panning motion.
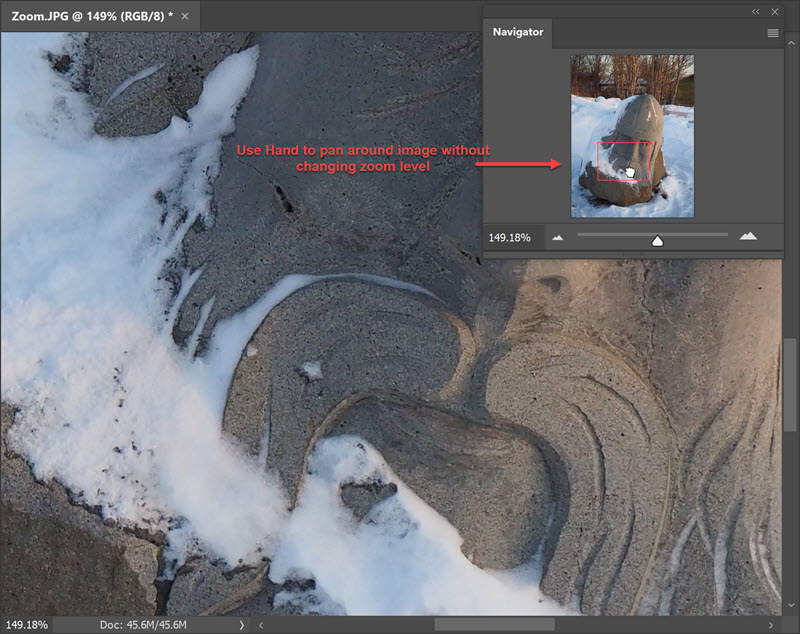
As you can see the Navigator panel is like a combination of the Zoom tool and Hand tool functionality.
That ends this tutorial on how to zoom and pan in Photoshop. Don’t forget Z for Zoom and Spacebar for panning using the Hand tool.
How To Use Panels And Customise Your Workspace In Photoshop
Panels are movable blocks of tools such as swatches, adjustments and layers.
You can arrange and rearrange them to suit your workflow and save your custom workspace.
In this section, you’ll learn how to work with panels.
We use panels all the time as they provide extra functionality. They are an important part of the Photoshop workspace and they can be moved around, resized, collapsed to icons and hidden.
Panels and Menus
At the time I am writing this, there are over 30 different Panels in Photoshop. These range from Color and Swatches panels to Layers and Character panels. Each panel has its own unique function that helps up create and modify images.
As you can imagine, 30 panels would take up a lot of space in your workspace, so luckily we can customize their size and location and can hide and reveal them as needed. When you’re happy with your panel layout, you can save the setup as a workspace.
Let’s get started with working with panels. Make sure you have an image open in Photoshop as you follow along.
Hide All The Panels In One Go
To get a better view of your image, you can hide all open panels in one go by pressing the Tab key. To see them again, press Tab again. When you hit the Tab key, the Tool Options bar at the top of the screen and the Tools and all the open panels are hidden. This gives you an uncluttered view of your image.
Press Shift + Tab to hide all the panels except the Tool Options bar and Toolbar.
How To Rearrange Panels
By default, Panels sit on the right-hand side of the Photoshop workspace, but we can rearrange their location and their groupings to our own liking.
Make A Panel Appear At The Front Of A Group
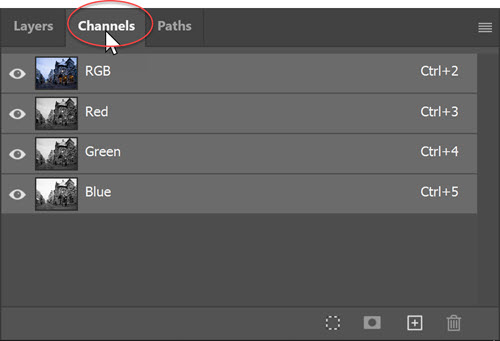
Panels are grouped together, for example, Layers, Channels and Paths are a default group. To make a panel appear at the front of its group, click on that panels name tab.
Move A Panel Out of a Group
To move a panel out of its group, click on the Panel Tab name, for example, Layers, and drag the tab away from the group.

An outline of the Layers panel will appear as you drag. Drop the panel wherever you want on the screen

The Layers panel is now floating by itself, no longer part of its former group of panels.
Move A Panel from One Group to Another
To drag a panel from one group to another group, click on the panel Tab and drag it to that group. As you drag the panel over the group, a blue line will appear around the group. This indicates that the panel you are dragging will become a part of that group.
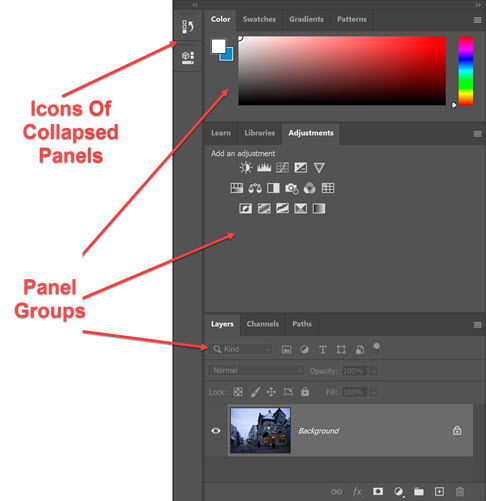
Collapse A Panel or Group Of Panels
To keep a panel or a group of panels on the interface but reduce the amount of space it takes up, we can collapse them to an icon or group of icons. Click on the double arrow at the top of the panel or panel group to minimise.

To expand the group again, click on the double arrow and it will expand back to normal size. To expand a single panel, simply click on the icon or the double arrow.
Resize A Panel Or Panel Group
To resize a Photoshop Panel or Panel Group, move your cursor over the right edge, or bottom edge, or corner. The cursor changes to a double arrow and you can click and drag the edge to resize.
Panel Menus
Most Photoshop panels contain a context-sensitive menu.
You open the menu by clicking on the three lines in the upper right corner.
In the example below, you can see all the menu options which are available when working with the Character panel. If you clicked on the Paragraph panel tab to make it active, and then clicked on the menu, you would get a completely different set of menu options.

Where to find all the panels In Photoshop
If you are looking for a panel and can’t currently see it on your screen, click on the Window menu and then choose the panel you are looking for from the list.
The complete list of panels appears on the Window menu. A correct mark indicates that panel is currently open or visible on the interface.

Close a Panel
Click on the X in the upper right corner of the panel.
Try It Out Yourself:
Spend a few minutes playing around with the panels. Rearrange the groups so that you have some panels floating by themselves, and other groups with 4 or 5 different panels in each group.
Try opening some panels from the Window menu and try closing some panels that are currently open. It’s ok to make a mess of your workspace!
How To Save Your Customised Workspace In Photoshop
After you’ve rearranged and set up your workspace just the way you want it, you can save this configuration as a new workspace.
Choose Window > Workspace > New Workspace.
Type a name for your workspace.
As well as saving your panel setup, you can choose additional options under Capture. You can save Keyboard shortcuts, Menus and the Toolbar location.

Photoshop offers several preset workspaces which modify which panels are visible.
Presets include Essentials – which is the default workspace, 3D, Graphic & Web, Motion, Painting and Photography.
To pick a workspace preset aimed at photographers or retouchers:
Choose Window > Workspace > Photography.
How To Reset Your Photoshop Workspace
If you’d like to get your workspace back to how it looked when you first opened Photoshop, you can simply reset it. To do that, choose Window > Workspace > Reset (Workspace).
To see more beginner Photoshop tutorials related to the workspace, click here.
Now you know (almost) everything you need to be a whizz working with Photoshop panels.
I hope you found this guide to getting started with Photoshop useful.
If you don’t have a copy already, you can download a free Photoshop trial here.
Sign Up For The Photoshop Bootcamp Newsletter And Get A Free Toolbar Cheatsheet
Join over 1800 Photoshop beginners and improvers who have signed up to the Photoshop Bootcamp newsletter. Get Photoshop tips and tutorials delivered right to your inbox.
