Physical Address
304 North Cardinal St.
Dorchester Center, MA 02124
Physical Address
304 North Cardinal St.
Dorchester Center, MA 02124

Last Updated on December 30, 2021
*Updated January 2022*
Let’s take a look at the difference between bitmap images and vector graphics.
When you’re getting started with image editing, there are some technical concepts that you need to know that will help you decide which tools you can work with. I won’t bog you down with tons of boring technical jargon, but instead, give you a brief introduction to Bitmap (also known as Raster images) and Vector images and the differences between the two. By taking a few minutes to learn about it, you’ll have a much better understanding of how to work with both of these image types in Photoshop.
Download a Photoshop Free 7 Day Trialg(23567528)a(3178728)947847937.gif)
In Photoshop you create and work with images that fall into two categories:
A Bitmap image, which is also known as a raster image, is made up of pixels.
A pixel is simply a block of colour. It is the smallest individual part of a digital image. Every digital photograph is made up of a grid of pixels and the number of pixels in the image will depend on the device used to create the image i.e. a digital camera or a scanner.
With a typical image taken from a modern camera, the pixels are so tiny and numerous that you don’t see them individually. However, when you zoom in and magnify your view of the image, you’ll see the image starts to look blocky. Those blocks are the individual pixels.
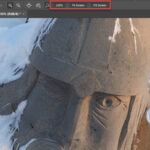
In the example below, you can see a picture I took of one of our dogs, Otto, using my camera phone. Viewed at 100% (or actual size) the individual pixels are not visible and they give the impression of blending together to form the overall image.

Viewed at 800% though, you can clearly see each colour box or pixel.

If you’re creating a brand new image in Photoshop, you decide how many pixels it has by entering the information into New Document dialog box when you’re creating a new file. The image resolution of your file affects the image quality and how large the file is.
If you know that you are creating graphics or editing photographs that will be used for print use or for print AND web, start your new file at a high resolution (300 ppi) . You can always lower the resolution of an image from 300 to 72 ppi.
It is generally not a good idea to try and go from low to high resolution. Very occasionally it might look “kinda ok” on screen when you go from low to high, but the quality will be poor and your design will suffer. It’s always better to start with a high res image and reduce its size and quality if needed rather than vice versa.
If you know that you are creating graphics or editing photos that will ONLY be used for web or on a screen, then you can start your new file at a low resolution of 72 ppi.
Here is where you determine the resolution when you choose File > New in Photoshop.

Most of the tools in the Photoshop toolbar work by manipulating pixels. For example, all of the tools that work with brush tips, such as the painting tools, the clone stamp tool, the blur tool and so work by changing or affecting the individual pixels in your image or design.
When it comes to saving your files, JPEGs, GIFs, PNGs and TIFFs are all raster image file formats. Raw files from your camera are also raster images, and you can edit them in Photoshop using Camera Raw.
Vector images are composed of points and paths. They are shapes and lines created by mathematical equations. The shapes can be filled with solid colours or gradients or they can have strokes (a sort of outline) or they can have both a fill and a stroke.
The really great thing about vector images is, any object you draw or create this way can be scaled up without any loss of quality. Unlike raster images which can look blocky and distorted as you scale up in size, vectors keep their beautifully smooth curves and crisp lines. That is why vectors are used frequently in graphic design, especially for logo design.

In the image below, you can see two versions of Mickey Mouse, the one on the right is a raster image made up of pixels, while the one on the left is created using vectors. At 100% both look fine. (Mickey Mouse is copyright of Disney)

Now if each version of the image is enlarged, the vector version (on the left) keeps its beautiful smooth curves and precise lines, while the raster version looks horribly blocky and pixelated.

Photoshop has a smaller number of tools which work specifically with vectors. They are the Pen tools, the Path and Direct Selection tools, the Shape tools and the Type tools. All of which you can use to create and design graphics which can be increased and decreased in size with no loss of quality.
Check out my Beginners Guide To The Photoshop Pen Tool here.

When you create Type in Photoshop, the characters are made up of vector-based type outlines that describe the letters, numbers, and symbols of a typeface. When you scale or resize type, save a PDF or EPS file, or print the image to a PostScript printer, the vector outlines are preserved. As a result, it’s possible to produce type with lovely, clean crisp, resolution-independent edges. You can make the text as big as you want and it will always look sharp.

That concludes this short guide to Raster and Vector images. I hope you’ve found it useful. If you’d like to learn how to use Photoshop’s Vector tools check out my beginner’s guides:
If you have any questions or comments please add them below. I’d also be really grateful if you would share this guide. Thank you!
Download Photoshop Free 7 Day Trialg(23567528)a(3178728)806360245.gif)
Pin This!