
Updated Oct 2022. In this short Photoshop tutorial, I’ll show you how to use the Healing Brush and Patch tools to remove wrinkles. These tools can be used to remove all kinds of blemishes, dust spots and other image imperfections.
The Clone tool tends to be the “go-to” tool when people first start to learn about retouching in Photoshop. Two other tools which are often overlooked are the Healing Brush and the Patch tools.
If you don’t have a copy already, you can download a free Photoshop trial here.
We’re going to remove some wrinkles from an older lady’s face. To ensure that we get a realistic result we’ll first duplicate the background layer and carry out all changes on this duplicate layer. On completion of retouching, we’ll use the two layers together to get a more natural look.
Retouch on a separate layer
One way to protect your original image is to do your retouching work on a duplicate layer of the original image. Then, you can retouch the duplicate layer without harming your original. When you finish retouching, you can blend the two layers. This technique usually enhances the results, making your retouching work look more natural and realistic.
Photoshop Healing Brush
The Healing Brush tool works by taking sample pixels from an image to let you correct imperfections. The amazing thing about the Healing Brush is that it attempts to match the lighting, shading, texture and transparency of the sampled pixels to the pixels being healed. It results in a very natural-looking image.
1. Open up the image that you want to retouch. I’m working on a portrait photograph of an older lady.

2. In the Layers panel, click on the Background layer and then press Ctrl+J /Cmd + J to create a duplicate layer. Double-click the new layer (called Layer 1), and rename it Repairs and press Enter (Windows) or Return (Mac OS). Leave this new layer selected (highlighted in blue).

4. In the toolbox, select the Healing Brush tool or press J. ![]()
5. On the tool options bar, open the Brush pop-up panel and set the brush diameter to a suitable size – you need it to be big enough to cover wrinkle lines – I chose 12 pixels.
Close the panel and select the Aligned checkbox. Leave the other settings at their defaults ( Normal selected as the Mode option and Sampled selected for Source).

Notice the two wrinkles running horizontally across the woman’s forehead. (Zoom in if necessary.)
6. Hold down Alt (Windows) or Option (Mac OS) and click a smooth area of the forehead, on the left side of the image, to set the sample point. Then, drag the Healing Brush tool over the lower of the two forehead wrinkles.
As you drag, you’ll notice that the painted pixels don’t exactly match the subject’s natural skin tones. When you release the mouse button, however, the colours correct themselves so that the wrinkle is covered and the skin looks quite natural.

7. Continue painting with the Healing Brush tool to remove the upper forehead wrinkle and the furrow line between the eyebrows.

Photoshop Patch Tool
The Patch tool combines the selection behaviour of the Lasso tool with the colour-blending properties of the Healing Brush tool. With the Patch tool, you can select an area that you want to use as the source (the area to be fixed) or as the destination (the area used to do the fixing).
Once you’ve made your selection then you drag the Patch tool marquee to another part of the image. When you release the mouse button, the Patch tool completes the job. Make sure that the Retouch layer is selected in the Layers panel before you continue.
1. In the toolbox, select the Patch tool (![]() ).
).
2. Drag a marquee around the wrinkles under the eye using the Patch tool.

Move the Patch tool inside the selected area and drag it to a smooth, similarly toned area on the forehead. Let go of the mouse key and voila! Wrinkles removed.
It’s going to look a bit weird before you release the mouse but once you do, you should see a nice patch of smooth skin under her eyes. You’ll notice that the marquee stays active over the repaired area, ready to be dragged again, either to another area that needs patching (if the Destination option is selected) or to another sampling site (if the Source option is selected).

3. Continue to use the same technique to erase the wrinkles under the other eye.
4. Touch up other parts of the subject’s face with the Patch tool until most of the wrinkles are hidden, or at least softened.

It’s very important that cosmetic touchups on the human face look as natural as possible. To make sure that things are looking too smooth or plastic-looking, we’re going to reduce the opacity on the repairs layer so that we can see a few of the wrinkles coming up from the bottom layer.
5. In the Layers panel, change the Opacity value of the Retouch layer to about 60%. Now, hints of the heaviest skin creases appear in the image – a bit more realism. The lady should have at least A FEW wrinkles!

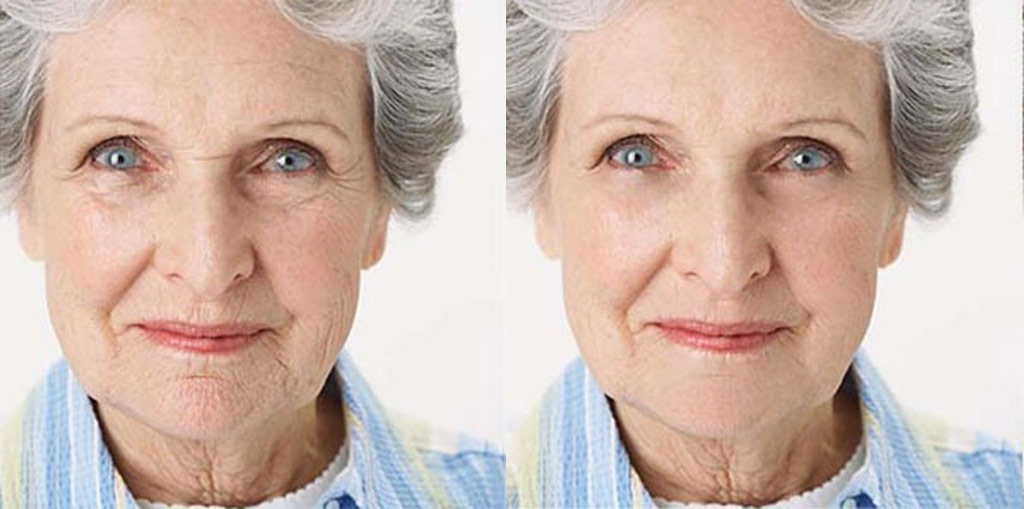
6. Click the eye icon ![]() in the layers panel to toggle the Repairs layer on and off. You should see a fairly large difference between the original image (on the left below) and the retouched one (on the right below).
in the layers panel to toggle the Repairs layer on and off. You should see a fairly large difference between the original image (on the left below) and the retouched one (on the right below).
And there you have it. Now to apply this to myself in real life : )
There are of course many ways to retouch images, this is simply one example using the Healing and Patch tools. Check out the Spot Healing Brush Photoshop tutorial, and Content Aware Fill and Content Aware Move tools.
Please share this post. Thank you!
If you don’t have a copy already, you can download a free Photoshop trial here.
