- What Are Photoshop Layers?
- Step 1. Photoshop Layers Panel
- Step 2. Add A Text Layer In Photoshop
- Step 3. Add Another Text Layer To Create A Subtitle
- Step 4. Add A New Layer In Photoshop
- Step 5. Add A Rectangle Of Colour
- Step 6. Rename A Layer
- Step 7. Rearrange Layers (Change The Stacking Order)
- Step 8. Change The Opacity Of A Layer
- Step 9. Add A Gradient Layer
- Step 10. Add A Second Image To A Photoshop File
- Step 11. Transform A Layer
- Step 12. Add Layer Styles
- Step 13. How To Save Layered and Flattened Files In Photoshop
- You Now Know Photoshop Layer Basics!
- Extra Photoshop Layer Tips
Learn How To Use Photoshop Layers By Making A Postcard
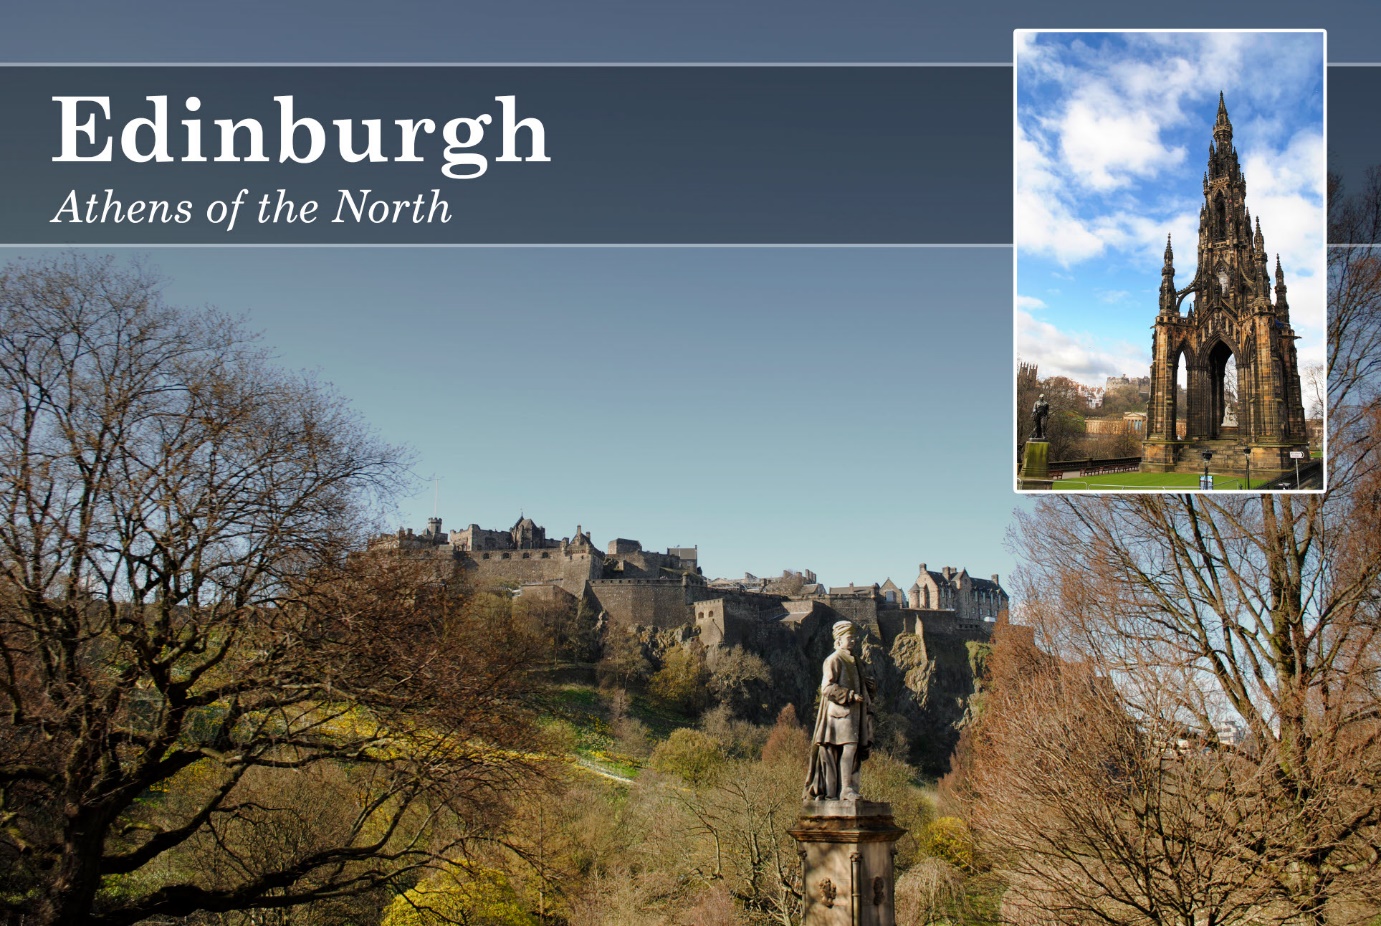
This is a practical, project-based tutorial and beginner’s guide to using Photoshop layers. You’ll learn how to use layers to create a composition with different types of layers. We’ll combine two image layers, a text layer, a gradient layer and layer effects. The skills you learn here can be used to make posters, flyers, social media graphics or any type of visual document or graphic that you want.
What Are Photoshop Layers?
Photoshop layers are like transparent sheets stacked on top of each other. Each layer can hold different parts of your picture or design. This allows you to edit or move parts of your image without affecting the rest.
For example, you could add text on top of your photo. The text is added as a layer above the original photo layer. You might decide to add a person or an object from another photo. These can be added on separate layers.
These layers are “stacked” on top of each other. This makes it easy for us to edit our compositions. We can easily move individual layers, we can delete them, we can transform them.
We can also turn the visibility of layers on and off. Without layers, it would be much more difficult to create imaginative artwork and designs that we CAN create with layers.
Step 1. Photoshop Layers Panel
Let’s start our composition by opening a photo. Choose File > Open then choose the picture you want to open in Photoshop and click Open.
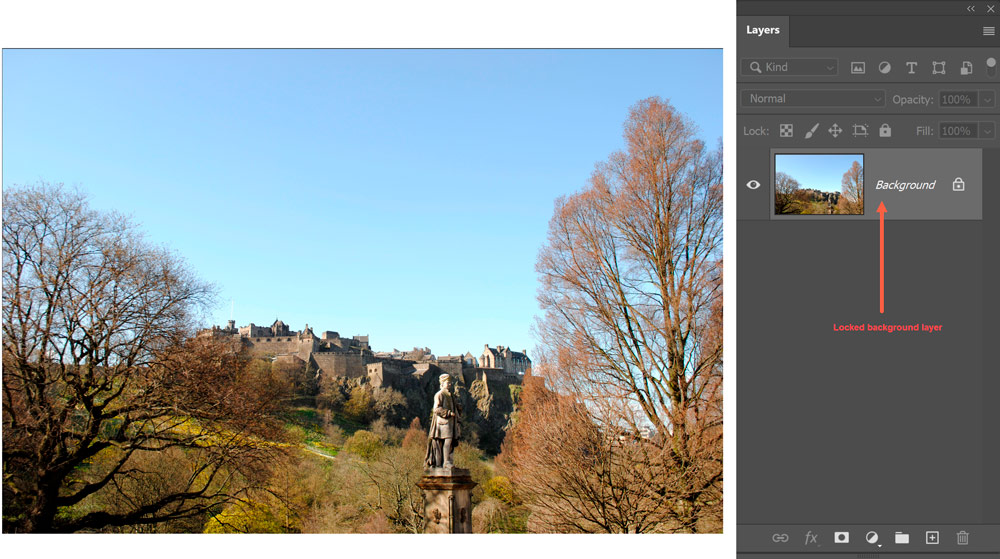
By default, the Layers panel (sometimes called the Layers Palette) sits in the lower right of the screen in Photoshop, but you can drag it to wherever you want on the workspace.
If you can’t see the Layers panel on your screen, you can open it by choosing from the menu at the top of the screen, Window > Layers, or press F7 as a keyboard shortcut.
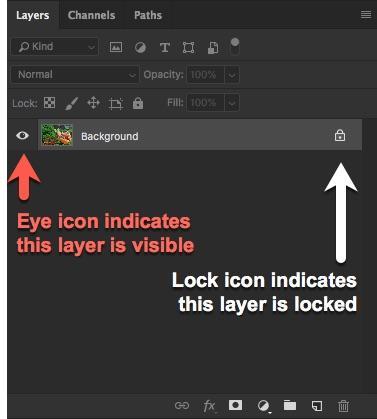
Let’s look at what the Layers panel is showing us. This image currently has only one visible layer called the Background layer. This is a special type of layer that is locked in position. We know the layer is locked because of the small lock icon to the right of the layer’s name.

The eye icon to the left tells us that that layer is currently visible and we’ll see more about how this works shortly.

In between the layer visibility icon and the layer name, you’ll see a small preview layer thumbnail of the artwork that appears on that layer.
Step 2. Add A Text Layer In Photoshop
When you add text to an image in Photoshop, it automatically creates its own layer to hold the text. You don’t need to create a new one before you start typing. (We’ll look at working with typography and ading text in Photoshop in a future lesson).
Select the Type tool on the toolbar or press T on the keyboard.
Click once on the photo to add text.
Photoshop adds some dummy text – “Lorem Ipsum”. This text is automatically highlighted, so that means we can change both the actual words in the text and its formatting.
I’ve added the word Edinburgh to my photo and used the following settings in the tool options bar at the top. The typeface I’ve used is Century Schoolbook Bold, size 60pt and the colour white.

Click on the Commit button on the options bar to finish adding your text. You can come back at any time, click on the text with the Type tool and edit it again.
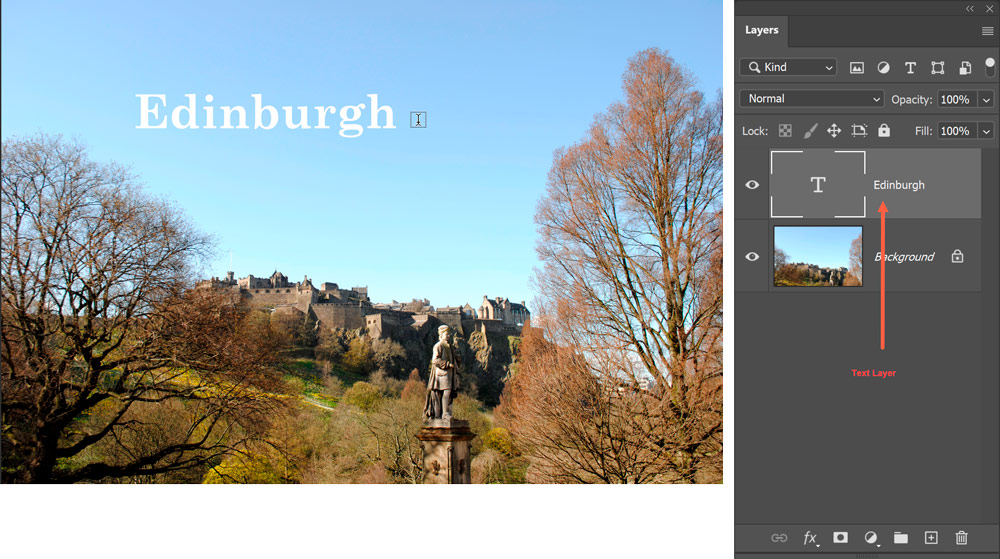
Notice that a new text layer has appeared on the Layers panel. The layer features a thumbnail with a capital T in it and the actual text you typed appears to the right of the thumbnail.
Because the text is on a separate layer to the image, we can use the Move tool (V) to move your text wherever you want it. And this is the joy of using layers. Because we are isolating different parts of our composition, we have total control.
Step 3. Add Another Text Layer To Create A Subtitle
Let’s add some more text to our image. Once again click on the Type tool or press T on the keyboard.
This time I have set the type options at the top as follows: Typeface is Century Schoolbook Italic, size 30 pt, colour white.
Click once on your canvas to add text.
Change the Lorem Ipsum text. I’ve typed in “Athens of the North”. Then click on the Commit button on the options bar, to finish adding text.

And now we have two Type layers above our main Background layer image.
Step 4. Add A New Layer In Photoshop
Although the text we’ve added is visible, it’s still a bit hard to read because it is white on a light blue sky. A graphic design trick to improve legibility is to add a semi-transparent block of colour to a new layer and place it behind the text.
To add a new layer to a document, click the New Layer icon at the bottom of the Layers panel.

A new layer appears in the Layers panel directly above the currently selected layer. Photoshop automatically names each new layer, starting with “Layer 1”, “Layer 2”, “Layer 3” and so on.
Looking at the new layer’s preview thumbnail, we can see a checkerboard pattern. This pattern represents transparency, there is no artwork on it yet. We’re going to create a rectangle selection on this layer, then fill it with colour.
Step 5. Add A Rectangle Of Colour
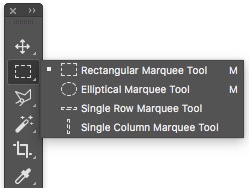
In the Toolbar, select the Rectangular Marquee tool, or press M on the keyboard.
Drag out a rectangle selection from the left side of the image to the right side.

Press the letter D on your keyboard to set your Foreground colour to black, and then press Alt + Backspace (PC) or Option + Delete (Mac) to fill this selection with black.
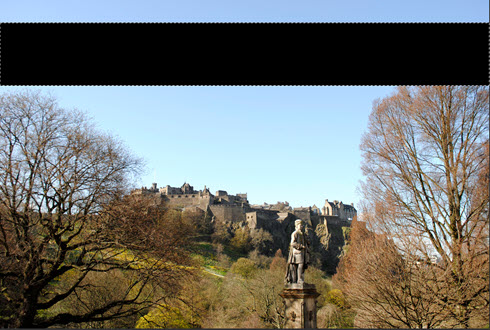
Press Ctrl + D (PC) or Command + D (Mac) to Deselect.
Step 6. Rename A Layer
When you only have two or three layers in your Photoshop file, it’s easy to keep track of what is on each layer. However, when you’re creating more complex graphics or artwork you may find you have LOADS of layers very quickly, so it is a good idea to give your layers a descriptive name. Here’s how to rename your layers.
Double-click directly on the layer name, in this case, Layer 1. The original layer name is highlighted and now editable. Simply type in the new name for the layer. I renamed it Black Bar.

Step 7. Rearrange Layers (Change The Stacking Order)
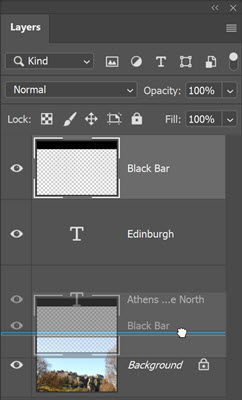
The black rectangle layer is sitting above our text, hiding it. We need to drag it below the two text layers.
Click on the new Black Bar layer to select it, then holding drag it down below both of the text layers.
Step 8. Change The Opacity Of A Layer
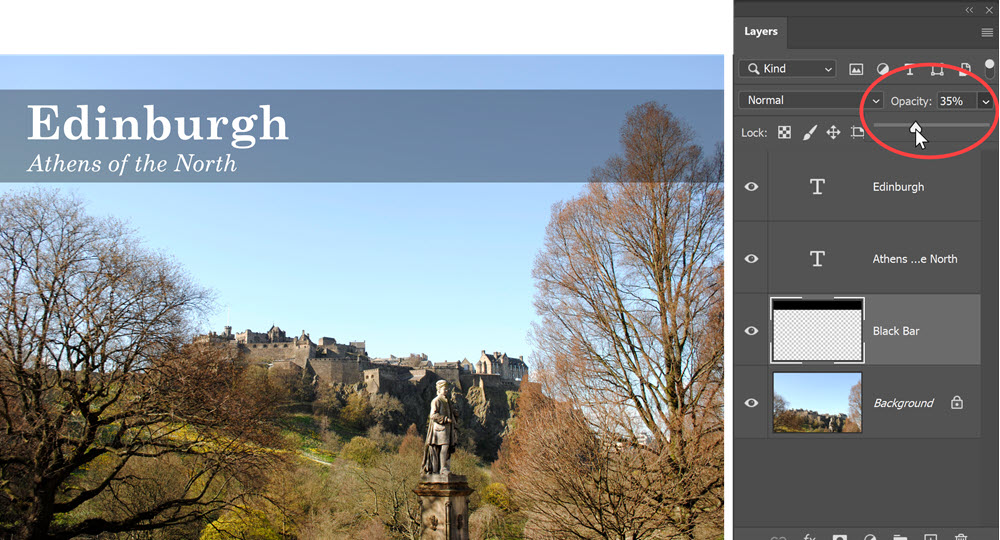
The black bar is too dark, so the next step is to reduce the layer opacity of that layer.
Make sure the active layer selected is the one you want to change the opacity on. Then on the Layers panel click on the Opacity slider and drag it down to about 50%.
This is a nice effect that is frequently used in graphic design. It allows us to use light text on a light-coloured background. And we can still see the image underneath.
Step 9. Add A Gradient Layer
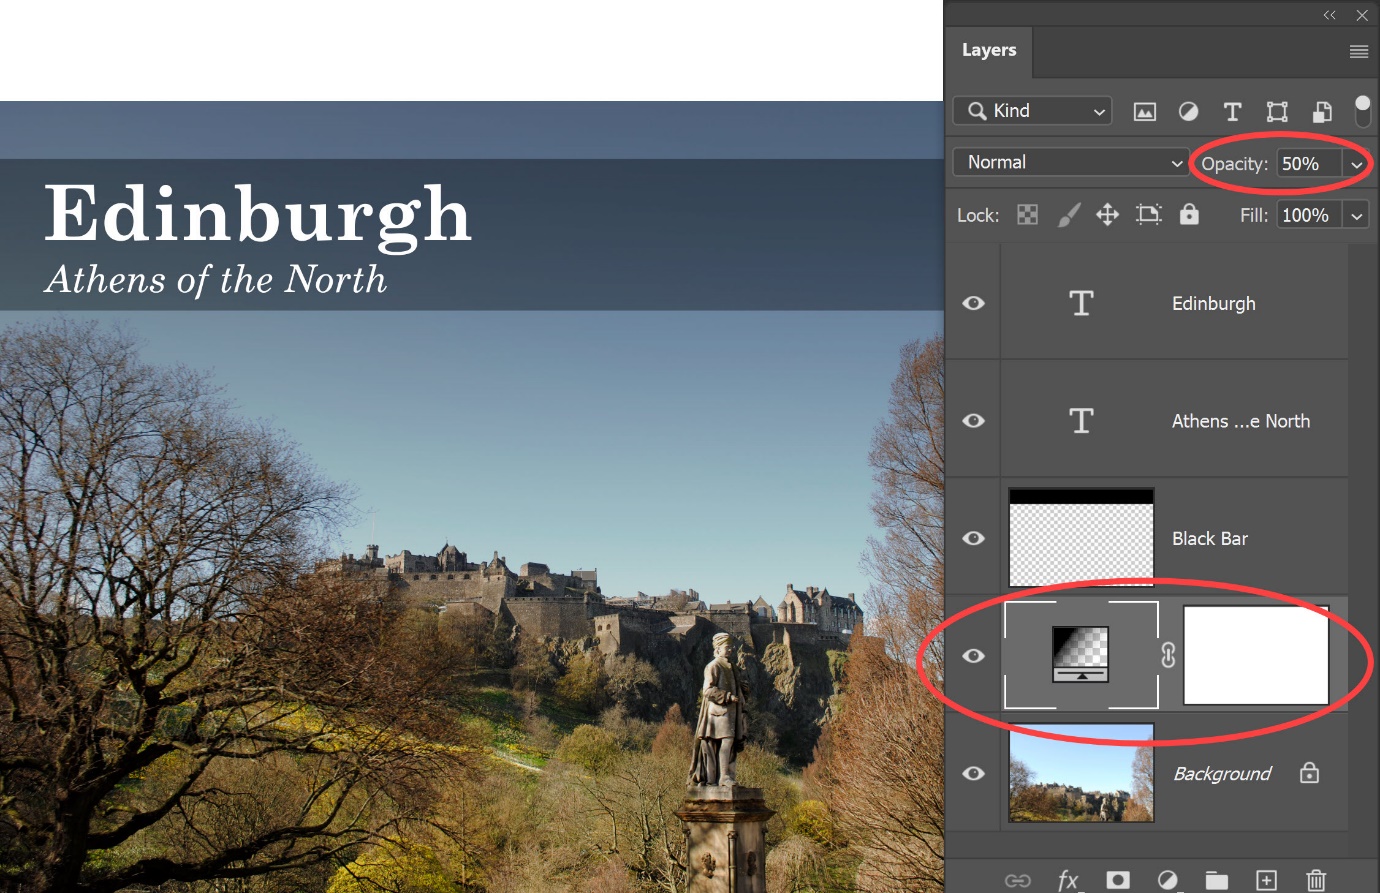
To darken the sky just a little more, let’s add a gradient layer to our composition.
We want our gradient to be dark at the top and light at the bottom. Press D to set the foreground colour to black and the background to white.
Click on the Background Layer to select it.
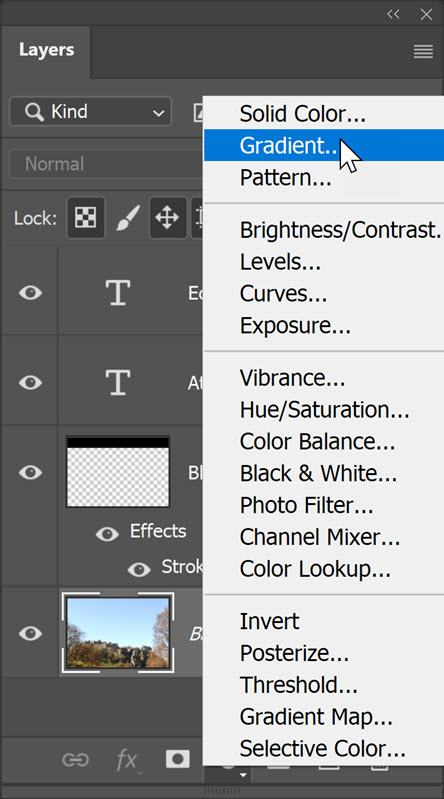
At the bottom of the Layers panel, click on the Add Adjustment Layer icon, and choose Gradient from the pop-up menu.
Note: An Adjustment layer lets us edit our images non-destructively. Nondestructive editing means we don’t change any pixels on our photograph or drawing, we make it on a separate layer that affects the layers below it.
Photoshop adds a gradient in a new layer on top of the background image.
The gradient needs to be dark at the top and light or transparent at the bottom. If your gradient is the other way around, click on the Reverse check box.
If you want to experiment and change the colour of your gradient, click on the Gradient drop-down box and choose another colour.
Using a Black to Transparent gradient, your image should now look something like this:
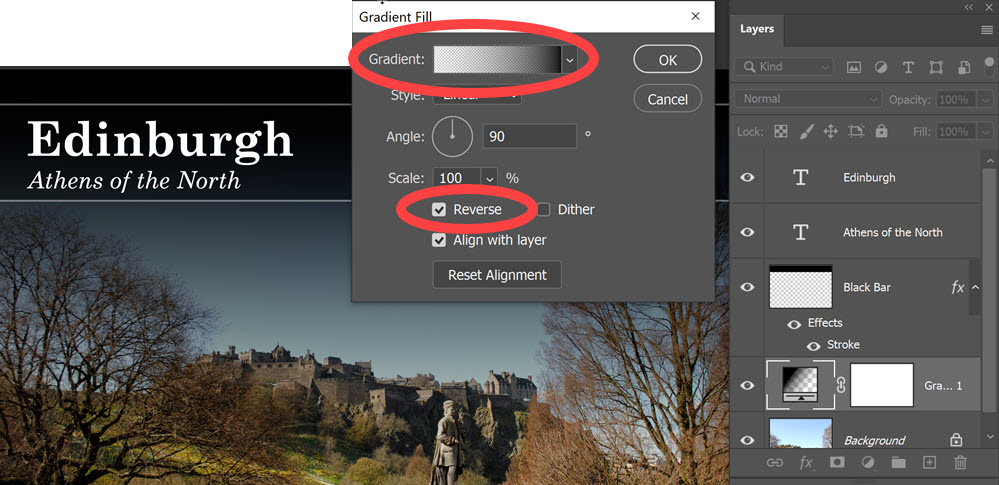
Click OK to finish adding the Gradient layer.
With the Gradient layer selected in the Layers panel, reduce the Opacity of the layer to about 50%.
This creates a very subtle but worthwhile effect.
Step 10. Add A Second Image To A Photoshop File
The next step in creating this composition is to add another image as a layer and resize it.
Open the second image in Photoshop.
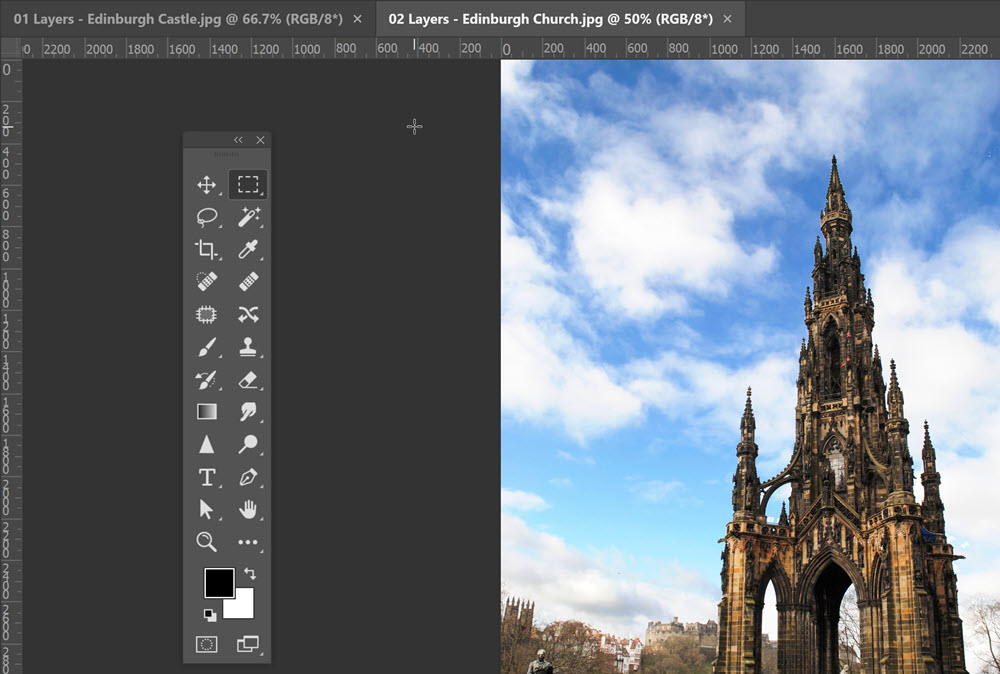
Press Ctrl + A (PC) or Command + A (Mac) to make a selection around the whole image.
Press Ctrl + C (PC) or Command + C (Mac) to Copy that image into memory.
Click back onto the original image tab then press Ctrl + V (PC) or Command + V (Mac) to paste this image into your layered file.
When you paste the new image into the original, it automatically appears on its own layer.
Step 11. Transform A Layer
The new image might be bigger or cover a large part of your original image. If that is the case we can scale it down by doing a Free Transform by pressing Ctrl + T (PC) or Command + T.
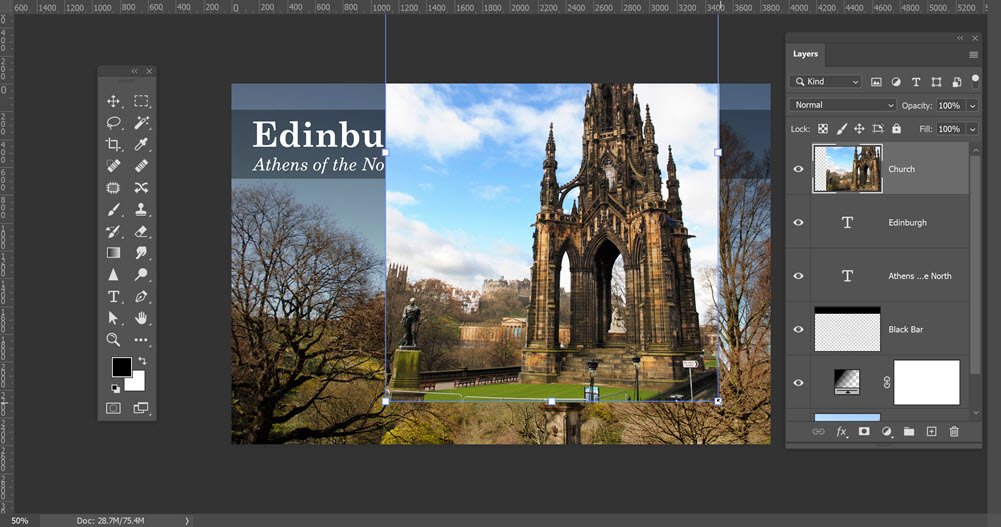
A bounding box appears around the image on the new layer. Click on one of the corner handles and scale down the image and move it to position over the Black Bar so it looks something like this:
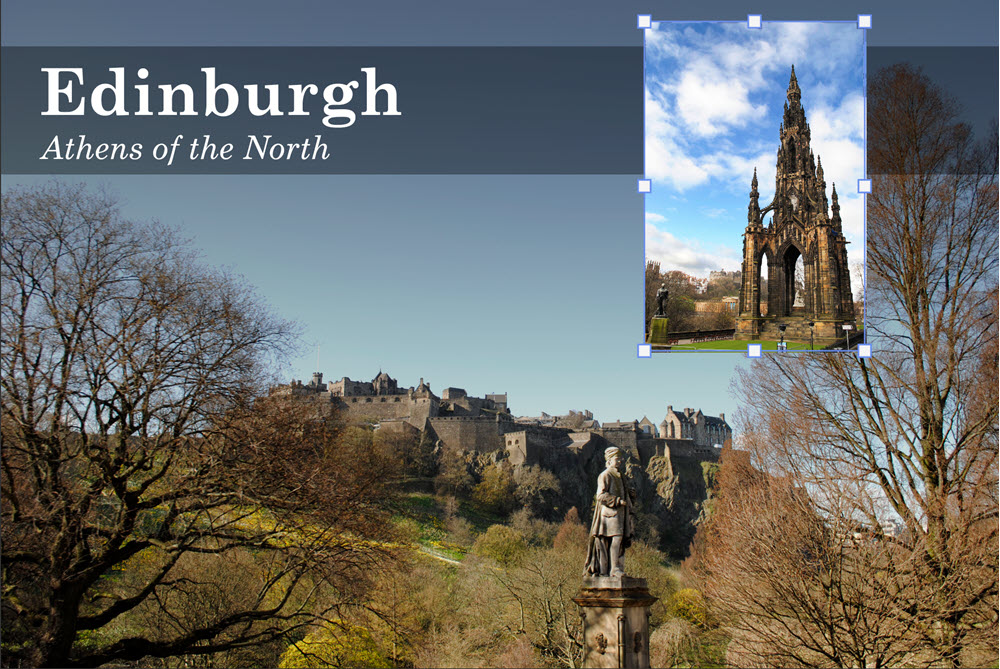
Press Enter / Return to commit the transformation.
Step 12. Add Layer Styles
Layer styles are also known as Layer Effects and they give us a simple way to add lots of different special effects to layers. Layer Styles include strokes, inner and outer glows, gradients, drop shadows and more.
How To Add A Stroke Around An Object In Photoshop
To make the second image stand out a little bit, we’ll add a stroke around it. We do this using a Layer Effect.
1. Make sure the layer with whatever image you’ve just added is selected or active.
2. At the bottom of the Layers panel, click on the Fx icon. Choose Stroke from the pop-up menu that appears.
3. Set the size to 10, Position to Outside and Colour to white. Click OK.
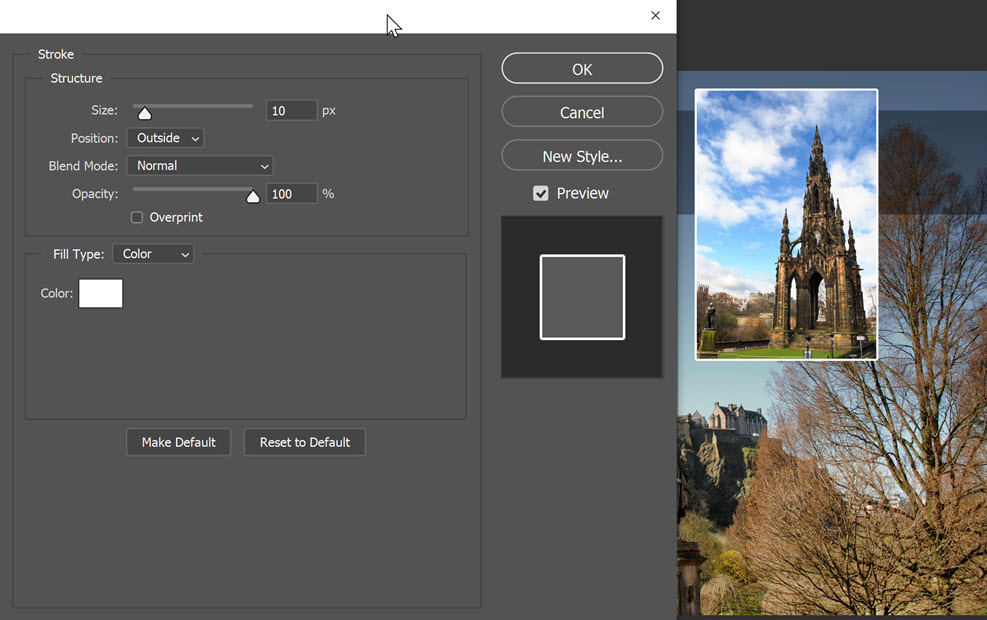
Look in the Layers panel and you’ll see there is an Fx icon appearing under the current layer. This signifies that there is a style applied to that layer.
How To Copy A Layer Style
To copy a style from one layer to another hold down the Alt (PC) or Option (Mac) key, then click and drag the style to the layer you want to apply it to.
Apply the same white stroke to the black bar layer, by holding down Alt and dragging the style from the Church layer to the Black Bar layer.
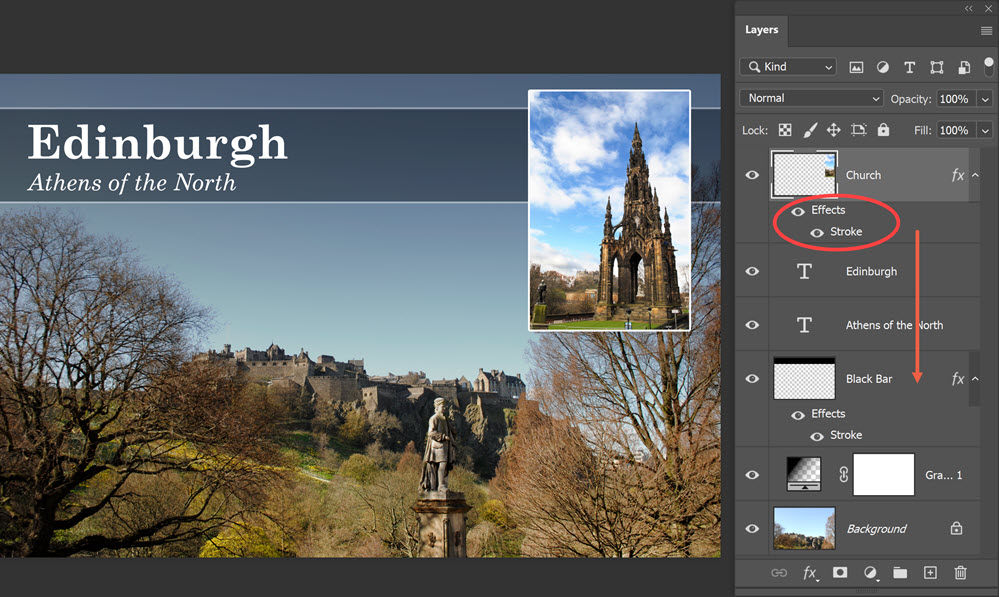
Notice that even though we copy the layer effect, the white stroke does not seem as heavy on the black bar layer. That is because the Black Bar layer has an opacity of 50%, so the added stroke also only has an opacity of 50%.
And that concludes our postcard design! Well done if you’ve been following along and got this far.
Step 13. How To Save Layered and Flattened Files In Photoshop
To finish up this guide, let’s take a look at how to save layered and flattened files, and what the difference is between them.
As you create graphics and new images in Photoshop, you’ll find that the number of layers in your compositions can grow quickly. Photoshop files with more than one layer are often referred to as “Layered” files.
It’s very, very, very important that you keep a copy of your layered files. It means that you can come back at any time and edit your work. By default, layered files are saved with the extension .PSD, which stands for Photoshop Document.
While it’s important to always keep your original PSD files, you may also need to send final “Flattened” files to clients or to send to a printer or to put on the web.
Flattened means that all the layers have been flattened down or compressed into a single layer. When we flatten files, the file size becomes much smaller. BUT we lose the ability to move things around on layers.
In Photoshop, you can flatten all of the layers in your composition, or you can just flatten certain layers to simplify and reduce the file size.
How To Save Photoshop Layered Files
Choose File > Save to make sure that you save all your changes to your existing layered file. By default layered files are saved as .PSD format.
How To Duplicate And Flatten Photoshop Files
Choose Image > Duplicate.
In the Duplicate Image dialog box, name the file Postcard-Flat.psd and click OK.
You now have an exact copy of your Postcard.psd file with all the same layers.
3. Close the original Postcard.psd file and leave the Postcard-Flat.psd file open.
4. Choose Layer > Flatten Image.
5. Choose File > Save. Even though you chose Save rather than Save As, the Save As dialog box appears because this is the first time you have saved this particular file.
Depending on where the image will be used, you can save your file as a .jpg, .png, .gif or choose from many other file types in the drop-down in the Save As dialog box.
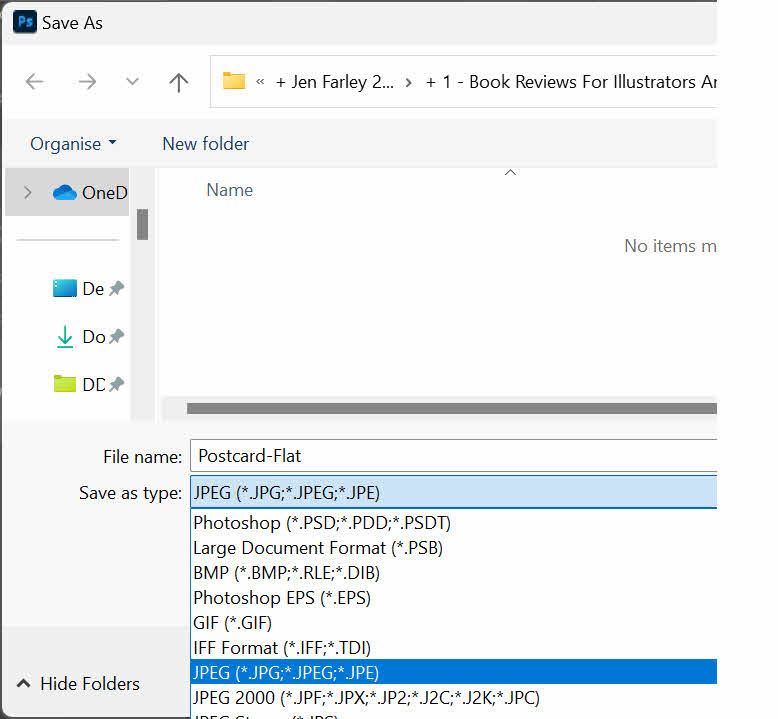
You now have saved two versions of the file: a one-layer, flattened copy as well as the original file, in which all the layers remain intact.
Merge Layers In Photoshop
Another way to flatten an image is to click on the layer panel menu button on the upper-right corner of the Layers panel and select one of the following items from the pop-up Layers panel menu:
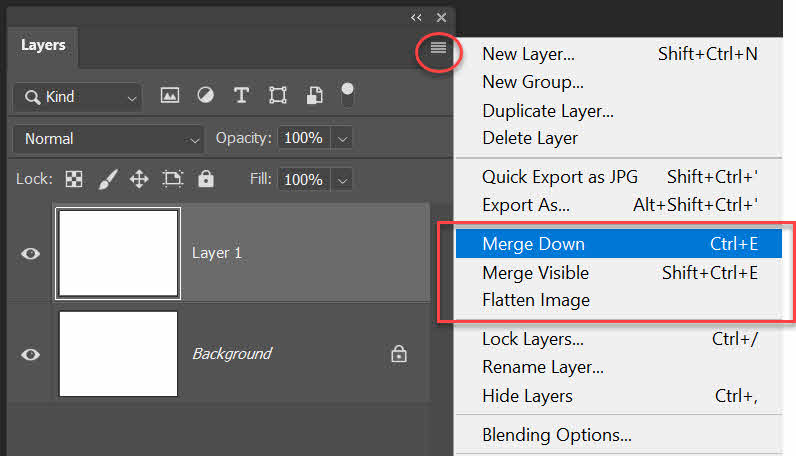
- Flatten Image: Flattens (combines) all the layers in the document.
- Merge Down: Flattens the selected layer and the layer directly below it.
- Merge Visible: Flattens all the layers that have the Eye icons turned on. This is a great way to selectively flatten layers that aren’t next to each other in the Layers panel.
- Merge Linked: Flattens the layers that are linked to one another. This is another method of merging non-consecutive layers. You won’t see the Merge Linked choice in the Layers panel menu unless you select a linked layer.
And that my friends, is a solid introduction to Layers in Photoshop. Phew! There is a lot here and the best way to understand it is to practice and use the layers by making things.
You Now Know Photoshop Layer Basics!
You’ve used an two photograhic images on separate layers, text layers, a gradient layer and layer styles to create a composition.
Now that you know how to do that you can create pretty much any design you like for posters, flyers, web graphics, social media and anything you can think of really.

Extra Photoshop Layer Tips
How To Change The Layer Preview Thumbnail Size
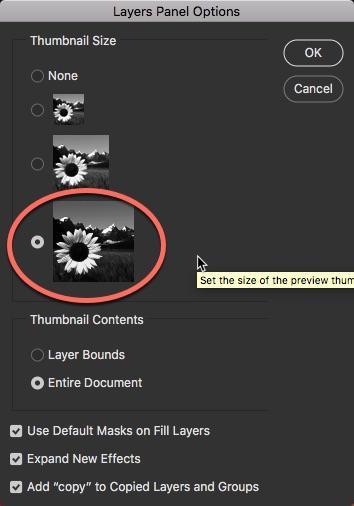
If you find it difficult to see what’s happening in the preview thumbnail on the Layers panel you can change the size of the preview.
1. Click on the Layers Panel menu (three horizontal bars on the top right) and choose Panel Options… from the drop-down menu which appears.
The Layers panel preview dialog opens.
2. Choose the size of the thumbnail you want. I pick the largest option.
3. Click Ok. You can now see bigger versions of the thumbnails.
How To Change The Size Of The Layers Panel
If necessary, you might need to increase the height or width of the Layers panel. Simply roll your cursor over the right hand side or the bottom right corner and click and drag out to increase the size of the panel.
How To Unlock The Background Layer In Photoshop
Click on the background layer and try moving it above the other layers. You will find that this layer cannot be moved. You will also notice a small lock icon beside the word Background on the layers panel.
The Background layer is immovable unless you convert it to a normal layer by changing it to a regular layer. Here’s how to do that.
Double-click the Background layer on the Layers panel. The New Layer dialog box opens.
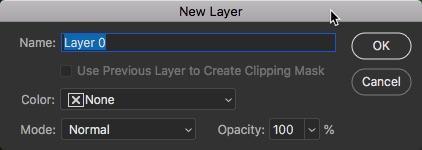
Change the default name of Layer 0 to something more descriptive and click OK.
Now try changing the stacking order of that layer. It will move just like any other regular layer.
How To Delete A Layer In Photoshop
There are a few different ways to delete a layer in Photoshop. Here’s two ways.
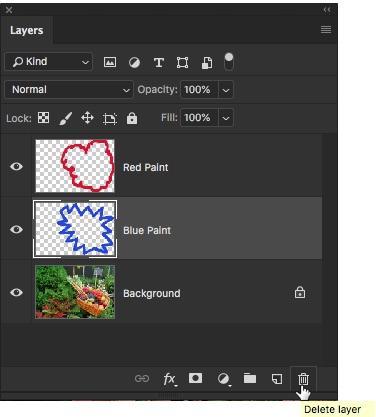
1. Highlight or select the layer you want to delete in the Layers panel. Click on the Delete Layer icon (it looks like a little trash can).
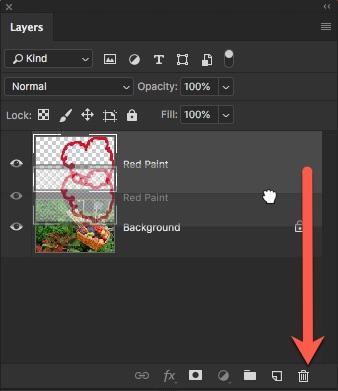
Or Click on the layer you want to delete and drag it down onto the Trash can.
How To Make A Duplicate Layer In Photoshop
We’ve already seen how to add a new blank layer to a document, but we can also make a copy of an existing layer using the Layers panel.
To copy a layer, click on it and, with your mouse button held down, drag it down onto the New Layer icon. Or use the keyboard shortcut for copying a layer in Photoshop, Ctrl + J (Windows) or Cmd + J (Mac). If you’re using a keyboard shortcut, make sure you have selected the correct layer in the Layers panel.
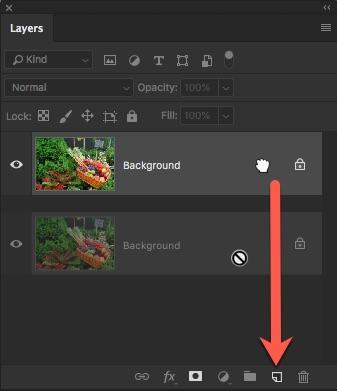
An exact copy of the layer appears in your Layers panel above your original layer.


