
Beginners Guide To The Pen Tool In Photoshop
I’ve been teaching both Adobe Photoshop and Illustrator for about fifteen years, and I can say without a doubt, the Pen tool is probably the most feared and avoided tool in both programs. It seems to be one of the tools that people have a go at once or twice, get frustrated and then vow never to touch it again. There’s usually a bit of cursing involved too J
It certainly can be a frustrating tool to use at the beginning if you’re not quite sure how it works, but with a little bit of learnin’ and plenty of practice, you’ll find that the Pen tool opens up a whole new world for you.
In Photoshop, the Pen tool can be used for drawing and for making selections.
There is a misconception that you can only create vectors in Adobe Illustrator, but you can create vectors in Photoshop using the Pen tools and the Shape tools. The Pen and Shape tools work in almost exactly the same way in both programs.
I’m breaking this guide into easily digestible chunks:
- How To Draw Straight Paths
- How To Add and Delete Points To Edit Your Path
- How To Draw Curves
- How To Draw A Closed Curved Path (e.g. Circle)
- How To Combine Straight and Curved Paths
In a separate post, I’ll show you how to edit the paths you’ve drawn with the Pen tool or any of the Vector Shape tools.
Note: All of the screen grabs you see here are taken from Adobe Photoshop CC, but everything you read here is applicable to pretty much every version of Photoshop going back several versions. So let’s get started with using the tool to draw straight lines.
Drawing Straight Lines With The Pen Tool
It is super easy to draw straight lines with the Pen tool, so that’s where we’ll start. Straight paths are created by simply clicking the mouse button. The first time you click, you set a starting point for a path. Each time you click after that, a straight line is drawn between the previous point and the current point.
Before we use the Pen tool, whether for making a selection or for drawing shapes, we need to configure the settings in the Options Bar.
1 – Draw A Path With The Pen Tool
1 - Open a new blank document in Photoshop. I’ve created one at 1000 x 1000 pixels with a resolution of 72ppi.
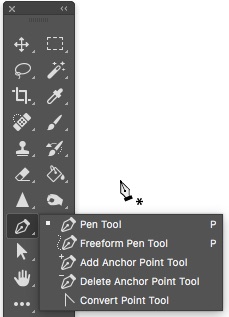
2 - In the toolbar, select the Pen Tool. The shortcut is to hit P on the keyboard.
3 - In the Options bar at the top of the screen;
- Choose Path from the first drop-down option. (We’ll look at the Shape option soon)
- Click the arrow for Geometry Options and make sure that the Rubber Band check box is not selected in the Path Options pop-up palette.
- Make sure that the Auto Add/Delete option is selected.
- Select the Combine Paths option.
Note: If you’re outlining a subject for selection, or for drawing a path to add pixels to afterwards, choose the Path option. If you wanted to draw a vector shape with the Pen tool, you would choose Shape. It’s not the end of the world if you choose the wrong one, but it saves a few steps if you pick the right one before you start.
When you first select the pen tool, before you draw any points, a small x will appear beside the cursor. The x means that you are about to start drawing a new path.
It’s important to pay attention to the small symbols which appear beside the Pen tool cursor because it tells you how the Pen will behave.
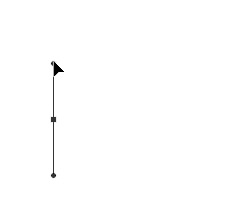
4 - Click once on the document where you want the straight line segment to begin. Do not drag.
5 - Move your cursor to another part of your document and click again to add the next point. The points that connect paths are called anchor points.
Note: If direction lines appear (they look like extra lines coming out of an anchor point), you’ve accidentally dragged the Pen tool and you will draw a curve rather than a straight line. If that happens, choose Ctrl + Z (Windows) or Cmd + Z (Mac) to undo, and click again.
Notice that the first anchor point you created when you clicked the first time is now hollow, while the last anchor point is a solid square. A solid anchor point means that it is currently selected.
6 - To continue creating your straight line segments, just keep clicking on the document where you want to put an anchor point and Photoshop will create the path in between.
Tip: If you want to constrain the angle of the segment to a multiple of 45° hold down the Shift key as you click.
The path you see above is called an Open Path. That means the starting point and the end point are different, they do not join. You do not have to create closed paths every time you draw. Open paths are perfect for drawing all types of lines.
If you want to fill an area with colour though, it’s a good idea to close the path. To close a path, simply click back to the first point you created. You will see a small circle appears next to the Pen tool pointer indicating that the path will close correctly.
Once you close a path, the cursor will immediately change to indicate that the next time you click on the document you will be starting a brand new path.
If you want to leave a path open but then start another new path, Ctrl + Click (Windows) or Cmd + Click (Mac) anywhere away from the path you drew. Alternatively, you can finish a path by clicking on any other tool in the toolbox.
2 - Add and Delete Anchor Points
There will be times when you want to add extra anchor points to your paths or delete existing anchor points that you don’t need.
A good rule of thumb when working with vector graphics is to use as few anchor points as possible to achieve smooth lines. This is particularly true when drawing curved paths with the pen tool, which you’ll see shortly.
Deleting an anchor point on a path
1 - Select the Delete Anchor Point tool from the toolbox (hidden under the Pen tool).
2 - Click on the point you want to delete.
Adding an anchor point on a path
3 - Select the Add Anchor Point tool in the toolbar.
4 - Click anywhere along a line segment using the Add Anchor Point tool.
Often the path shape may not look very different after you add a point to a straight segment, but when you edit the point (we’ll come to that in a future post) then you’ll see the difference.
Straight Path Pen Tool Practice!
So that’s how to draw straight line segments, very easy and nothing to be frightened of there. The key to using the Pen tool is practice, practice, practice.
Create a new Photoshop document and do the following:
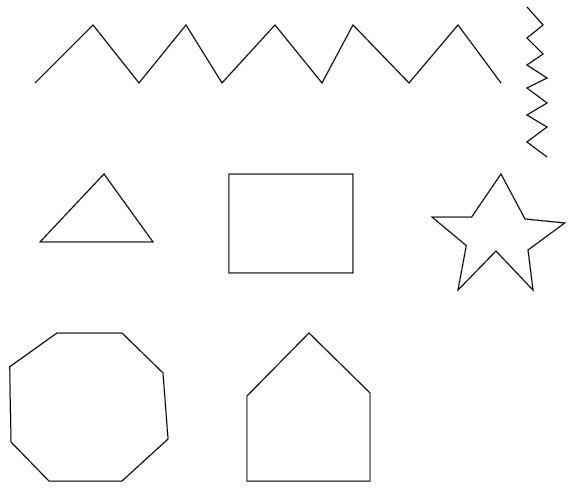
- Try drawing open paths of Zig Zags.
- Try drawing closed paths of triangles, rectangles, squares, polygons, stars and other random shapes where the first anchor point becomes the end point.
- Get a feel for finishing paths and starting new ones. Have a go at drawing all of the shapes below. It will help you get a feel for using the pen tool.
Drawing Curves With The Photoshop Pen Tool
In this part of the Pen Tool Guide, you’ll learn how to draw
- a gently curving open path (easy peasy)
- a close circle path (easy)
- a complex path made from curves and straight points (a bit more tricky, but an essential skill)
Once you’ve gained an understanding of how the curves work, combined with some practice, you’ll soon find yourself becoming a Pen Tool Master!
How curved paths are created
Unlike straight paths, which are simply a matter of clicking once, then picking where you want your next point and clicking again, curved paths are created by clicking and dragging out direction handles.
The first time you click and drag, you set a starting point for the curved path and importantly, you also determine the direction and size of the curve. As you continue to add a point and drag, a curved path is drawn between the previous point and the current point.
Two things happen when you click and drag with the Pen tool.

1 - An anchor point is placed on the artboard when you click.
2 - Direction lines and direction points are drawn when you drag.
We use the direction lines and points to determine the direction and shape of the curved path we’re drawing.
3 – Draw A Curved Path With The Pen Tool
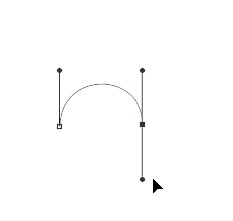
Let’s start by drawing a gentle curving line.
1 - Select the Pen tool (P) from the toolbar.
2 - Choose Path mode in the Options bar at the top of the screen.
Again, note that we could use Shape mode here, but in that mode, Photoshop fills the path with colour when you start drawing and it can become confusing as to where your anchor points are. We’ll talk about drawing shapes in another post.
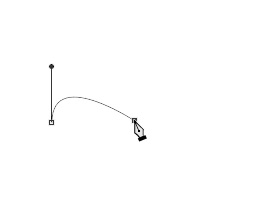
3 - Click once to put down your first anchor point.

4 - Move your pointer to the right of your first anchor point, then click and drag up and to the right. This creates a slight curve in the path and as you can see, two handles appear either side of the second anchor point. These are the direction handles and the control the direction of the curve and the size of the curve.
5 - Add another point farther to the right and click and drag in a downward direction. You should now be seeing a nice gentle wave-like path.
6 - Add one more point to the right and drag out horizontally.
7 - To finish drawing your path, just Ctrl + Click (Windows) / Cmd + Click (Mac). Notice how the Pen Tool cursor changes and a small asterisk appears. This indicates that when you start to draw again, you will be starting a new path.
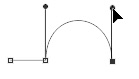
4 - Draw a closed circle path with the Pen Tool
A closed vector path is simply a path where the first anchor point is the same as the last vector point, for example, a circle, a rectangle, a star. We’ll draw a circle.
- Select the Pen tool (P) from the toolbar.
- Choose Path mode in the Options bar at the top of the screen.
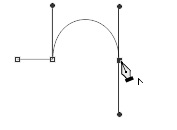
- Click, hold and drag the pen tool pointer upwards. In this example, we’re creating an upward curve.
An anchor point appears where you first clicked and two direction lines extend above and below the anchor point.
- Continue the curve, by clicking to add a new anchor point and holding and dragging downwards.
If you make a mistake while you’re drawing, choose Edit > Undo New Anchor Point or press Ctrl +Z (Windows) or Cmd + Z (Mac) to undo the last point you drew, and try again.
- Move your pointer over your first anchor point and notice how a small circle appears below the pen tool cursor. This indicates that if you click on the first point, you will close the path. So go ahead and click on the point.
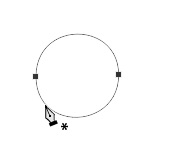
Your path is now closed and you should have a near perfect circle or at least a reasonable ellipse shaped path. It doesn’t matter if it’s a little egg-shaped :).
Remember you want to use as few anchor points as possible to get smooth curves when drawing with the Pen Tool.
Tip: If you hold down Shift as you click and drag, you constrain the slope of the directional line to 45° increments.
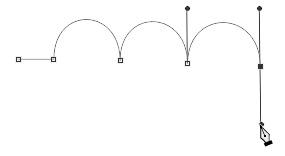
5 – Combine curved and straight path segments with the Pen Tool
Now we’ll draw paths that combine straight corner points with curved or smooth points, but first a brief explanation of directional lines.

Curved anchor points have directional lines that are opposite each other, 180° apart.
Corner (or straight) points either have no directional lines, only one directional line, or two directional lines that are at an angle that is not 180°. ( A little bit confusing, I know!)
Probably the most difficult part of drawing with the Pen Tool in Photoshop is joining up two curves on a corner point. If you can do this, then you can do any type of drawing with the Pen.
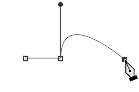
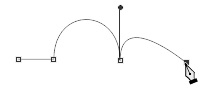
For this exercise, we’re going to draw the path below.

- Select the Pen tool or press P on the keyboard.
- We’re starting with a straight segment, which is dead easy, so click once for your starting point (don’t drag) and then click again to put down your second anchor.

- Now we’re going into a curve. Move the pointer over the second anchor point and hold down Alt (Windows) or Option (Mac), the cursor changes to show what looks like an upside down “v”. This indicates that you are going to convert the point from being a straight point to a curved point.

- Click on the same point and drag upwards in one motion to start the curve.

- Then click and drag downwards to create your next anchor point and finish the curve you started.

Now we need another curve. However, you will find that if you simply click and drag a new point, the curve is going down the wrong way. (Have a look again at the path we are trying to create above point 1).
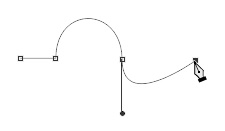
- To prevent this happening and have our curve go up again, we need to start a new curve by holding down Alt / Option + Clicking on the last anchor point. You will again see the little upside down “v”. This basically resets the curved point to a straight point.
- Click on the anchor point again and drag upwards to create a second curve going up. It will look as though you have dragged the new handle over the previous handle.
- Add a new anchor point and drag down to finish the second curve.
- Repeat step 6, 7 and 8 to create a third “upwards” curve.
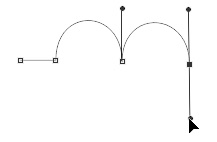
- To finish up, we need to convert from a curved point to a straight point. Once again, hold down Alt / Option and click once on your last anchor point.
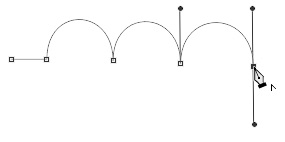
- Click again to put down your last anchor point. You should now have made a path that looks like this;
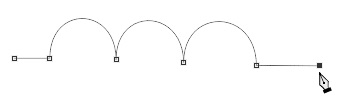
- Ctrl / Cmd + click anywhere to complete the path.
You’ve now successfully joined straight and curved segments in a path drawn with the Pen Tool. This is the hardest part of drawing with the Pen Tool and the one you need to get the most practice with.
There is, of course, lots more to learn about the Pen tool, but at this stage, lots of practice combining straight segments and curves will turn you into a Pen tool master really quickly.
More Pen Tool Practice!
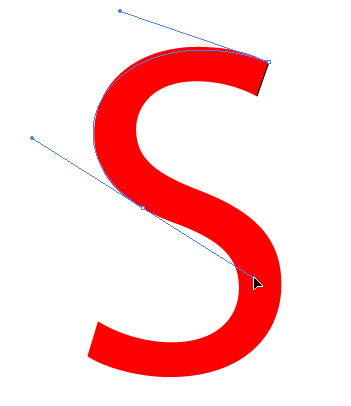
A really good way to practice combining curves and straight points with the pen tool is to try drawing the outlines of letters. Start with easy ones like I and Z, then try lowercase T, S, P and so on. This is an exercise I give to my classes and they find it useful. Don’t worry if your lines aren’t perfect at this stage, the main thing is to try things out.
I hope you’ve found this tutorial on how to draw straight paths and curves with the Pen Tool in Photoshop useful. The next skill we need to learn, in relation to drawing paths, is how to edit our points and paths. That is a separate guide that you can read here.
I’d be really grateful if you would share this post. Thank you! 🙂
Pin This!
Get A Free Printable Photoshop Toolbar Cheatsheet

Subscribe now to get a free printable poster showing all of the Photoshop tools and their keyboard shortcut.

Hello!
My name is Jennifer Farley. I’m an illustrator, designer, author and design teacher based in Ireland. I’ve been teaching and working in the design field for over 15 years and I help people learn Adobe Photoshop, Lightroom, Illustrator and Graphic Design.
Photoshop Bootcamp is a growing collection of my Photoshop tutorials and lessons I’ve written for my students.
