*Update: I first wrote this Photoshop tutorial for my students, waaaaaaay back in 2008. There have, of course, been many updates to Photoshop since then, but this method of creating a neon light effect still works perfectly well, if you want to try it out. You’ll notice that the Photoshop interface looks a bit old, as does the actor who plays Superman 🙂 , that I’ve used in the sample image. If you’re a beginner getting started with Photoshop, you’ll learn how to use layer effects to create an eye-catching neon effect.
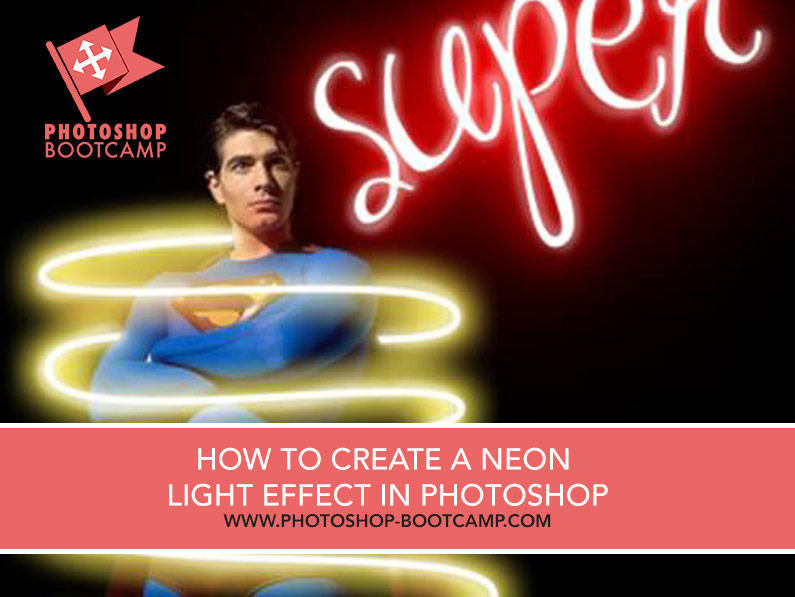
1. In Photoshop, open the image that you want to apply the effects to. I’m using this picture of Superman which can be downloaded from movieweb.com.
2. The first thing to do is separate Superman from his background. On this particular background, it’s easy to select Superman using the magic wand and then do a little bit of tidying up using the quick mask. Once you’ve made your selection, hit Ctrl + J (Windows) or Cmd + J (Mac) to add your selection to a new layer. Name this new layer “cutout”.
3. To make the light effects stand out a bit more, add a black background underneath the cutout layer, by creating a new Layer in the Layers panel and filling it with black paint using the Paint Bucket tool. Using the Move tool, move Superman in the “Cutout” layer down to the bottom left of the image.
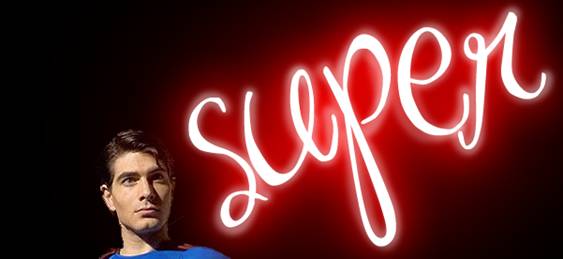
4. Now to add some text. The colour is white and the font used here is called MA Sexy and it has a nice loopy handwriting feel about it. You can get it free from dafont.com
5. With the new Super text layer selected in the Layers panel, click on the “add a layer style” button on the layers panel and choose Outer Glow from the drop-down menu.
Set the Blend Mode to Screen, Opacity to 100% and choose whatever colour you would like your light effect to be. I chose a bright red.
Set the Spread to 0% but give a fairly large size – this is something you can play around with to get the effect you like. I set mine to 185px.
6. Click OK. So now we have a bit of a glow coming from the word Super.
7. To make it look like the individual letters have a light effect applied to them we need to add a little more glow. Create a new layer and name it “Extra Glow”. Drag that layer underneath the Super text layer.
Apply a layer style again – choose Outer Glow – leave all the settings the same as before EXCEPT the Size. This needs to be smaller – in my case I set it to 51px. Then click OK. You won’t see any change yet because there is nothing on that layer yet – that’s our next step.
8. Select a very soft round brush and set the opacity of the brush to about 20%.
Start to paint around each of the letters in the word super. This will produce a nice, more authentic looking glow.
9. The next light effect I wanted to add was a bright orange glow around Superman. Create a new layer and name it “Spiral Glow”.
Use the Pen tool to draw a spiral shape across superman’s body. When you’re happy with the spiral, set your paintbrush to a hard, round, size 9 brush. Then on the Paths panel, click on the Stroke path with Brush.
10. This produces a nice clean spiral in front of Superman. However, we want to give the impression that the line is wrapping around Superman rather than just appearing in front of him. Select the eraser tool and erase alternate sections of the line so that the line appears to go behind Superman as well as in front.
11. Now add a glow to the Spiral layer in the same way you did in step in Step 5. Instead of adding a red glow, I’ve added a yellow glow but all of the other settings for the outer glow layer style are the same.
12. Create another layer called Extra Spiral glow and use the same settings as in Step 7. Now once again with a very soft, round brush set to about 20% opacity – draw on the spiral. This will give the glow some extra oomph.
That completes the neon light effects tutorial. Please share this tutorial or pin it on Pinterest. Thank you!
Get A Free Printable Photoshop Toolbar Cheatsheet
Subscribe now to get a free printable poster showing all of the Photoshop tools and their keyboard shortcut.