

Adobe Lightroom Classic, Meet Adobe Photoshop
*Updated Dec. 2020*
Adobe Lightroom Classic is a superb tool for photographers. It’s a (mostly) all in one solution for organising your photos, processing them and for presenting them – either as a slideshow or as printed pieces.
However, there are times when you may need to work that extra little piece of Photoshop magic on your image or parts of your image.
This tutorial shows you how to take your photo from Lightroom Classic to Photoshop and then bring it back again. The apps are tightly integrated, so the good news is, it’s really easy to do.
Here’s the quick version if you’re in a rush. If not Keep reading on, for a fully illustrated step by step example.
How To Open A Photo From Lightroom In Photoshop
- In Lightroom Classic, select the photograph you want to edit in Photoshop in the Library module or the Develop module.
- Right-click on the photo and choose Edit In > Photoshop CC from the drop-down menu.
- If you’re editing a Raw image, Lightroom will ask how you want to edit your photo in Photoshop. Choose Edit A Copy With Lightroom Classic Adjustments to open a copy of the photo with any Lightroom adjustments that you have already made.
- Your photo will open in Photoshop.
- Make the changes in Photoshop, then choose File > Save. Do not choose File > Save As.
- Go back to Lightroom. A copy of your newly edited photo will appear.
Step By Step - How To Open A Photo From Lightroom In Photoshop (with illustrations)
This might seem obvious, but I’ll say it anyway. You must have Photoshop installed on your computer to do this.
If you don’t have Photoshop, you can download a free trial here.
Set Preferences In Lightroom First
Before we bring our photos from Lightroom to Photoshop, let’s first set up the editor preferences – you only need to do this once.
1. Choose Lightroom > Preferences (Mac) or Edit > Preferences (Windows) and then click on the External Editing tab.
If you have either Photoshop or Photoshop Elements installed on your computer, Lightroom will automatically detect that and set Photoshop as your default external editor (see highlighted red circle above), but you can also specify some options for how the files are sent over to Photoshop.
Lightroom Preferences
The top of the dialog box shows options for choosing the file format of photos sent to Photoshop – either TIFF or PSD.
Choosing TIFF lets you pick a compression method (None or ZIP), meaning your image file size won’t be so big if you pick ZIP.
The options for colour space are ProPhoto RGB, sRGB and Adobe RGB(1998). If you’re working with RAW images, then ProPhoto RGB is the best option and recommended by Adobe.
If your camera is set to shoot JPEG or TIFF, however, you will need to choose one of the other two colour spaces because the camera is embedding one of those profiles in your camera. (Take a look in your camera manual to see which one).
2. Click the red circle in the top left corner of the preference box (Mac) or Click OK (Windows) to close preferences.
Once you’ve set your preferences up for external editing, you don’t need to do it again.
How To Get Your Photo From Lightroom Into Photoshop
3. Make sure the photo you want to edit in Photoshop is open in Lightroom, either in Library view or Develop view. In this example, I’m opening a Raw file.
4. Choose Photo > Edit in Adobe Photoshop CC (or whichever version of Photoshop you have), or use the keyboard shortcut Command-E (Mac) or Ctrl+E (Windows).
Or
Right-click on your image in Lightroom and choose Edit In > Edit In Adobe Photoshop CC.
If your photograph is a Raw file, your image now opens in Photoshop CC and you can edit it.
Note: You may get a pop-up message in Lightroom, like the one below. The message is a reminder that Lightroom may require the Photoshop Camera Raw plugin for full compatibility. Click Open Anyway. If you are keeping your Photoshop, Lightroom and Camera Raw plugin up to date on Creative Cloud, this is not a problem.
Open a JPEG file from Lightroom In Photoshop
If your photograph is a JPEG, rather than a Raw file, the following dialog box will appear:
Choose Edit a Copy with Lightroom Adjustments, then click Edit. This ensures you will retain any edits that you’ve already made in Lightroom, and they will be seen in the photo that opens up in Photoshop.
How To Get From Photoshop Back To Adobe Lightroom
4. Now, let’s say you’ve made some changes in Photoshop and you want to get back to Lightroom with your newly improved picture.
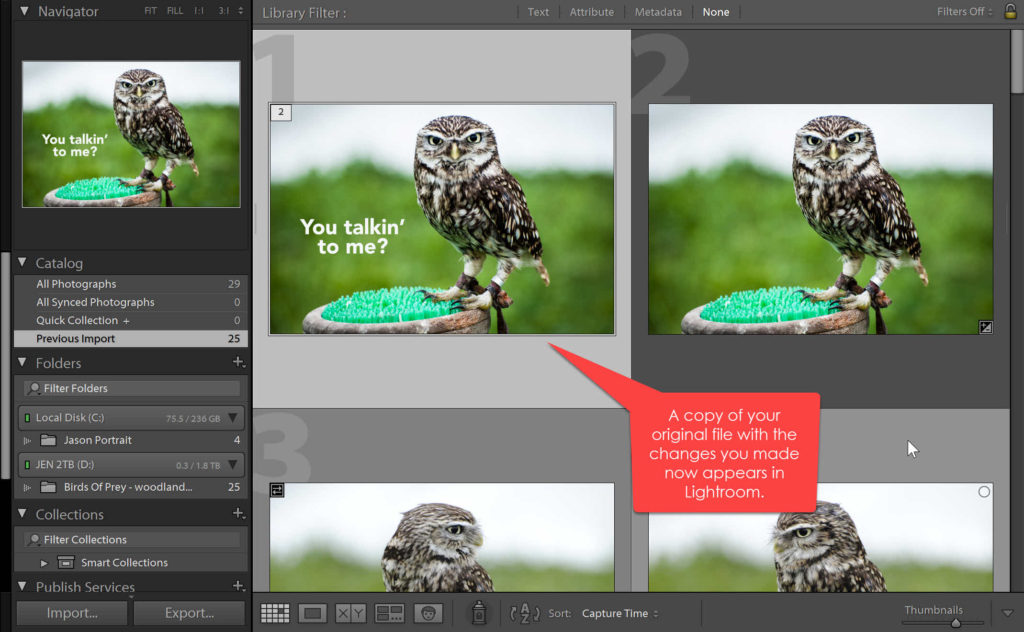
In my example below, I’ve added a piece of text to the photograph.
Now here is the important part!
Choose File > Save.
DO NOT choose Save As.
If you change the name of the file it won’t pick up the changes in Lightroom and your workflow is broken.
Go back into Lightroom and you will see your changed file and the original file in your Lightroom Library.
And that’s it! That is the Lightroom - Photoshop - Lightroom workflow and it works very well.
I hope you found this Lightroom and Photoshop tutorial useful. And I would be really grateful if you would share it. Thank you! 🙂
Pin This For Later
Get A Free Printable Photoshop Toolbar Cheatsheet
Subscribe now to get a free printable poster showing all of the Photoshop tools and their keyboard shortcut.
“Edit Photo in Photoshop” dialogue box has gone missing in LR 5. Image goes directly to PS with no available option to save LR editing.