Physical Address
304 North Cardinal St.
Dorchester Center, MA 02124
Physical Address
304 North Cardinal St.
Dorchester Center, MA 02124
Using Adobe Camera Raw filter in Photoshop, we can quickly improve an underexposed photograph. By using ACR (Adobe Camera Raw), we are editing our photo non-destructively. We can make as many changes as we like, without ever hurting any pixels, and this is really the best way to retouch a photo.
Download a Free Photoshop Trial including Camera Raw.
If this is your first time to use ACR, the interface might look a little bit complicated. There are lots of buttons and sliders to play with. However, ACR is actually very easy to use. With the use of the right sliders, you can quickly fix a multitude of problems. I will explain what each of the sliders we’re using is doing.
ACR was originally designed to work with RAW images from your camera, but more recent versions also work with JPEG and TIFF images. Read on to see how we can quickly and easily use Photoshop’s Adobe Camera Raw to bring an image back from the dark.
If you’re using a JPEG or a TIFF, the first thing to do is to convert our image to a smart object so we can then apply the filter.
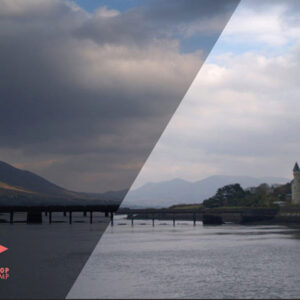
Step 1. Open an image that’s underexposed or too dark. I’m using a photograph of a bridge in Ireland. The image is underexposed and it’s hard to see any details on the bridge or the surrounding foliage.
Step 2. Convert the image to a smart object by Right-Clicking on the layer in the Layers Panel. A pop-up menu appears. Choose Convert to Smart Object.
A small icon appears in the bottom right corner of the layer thumbnail, indicating that the contents of this layer are a smart object.
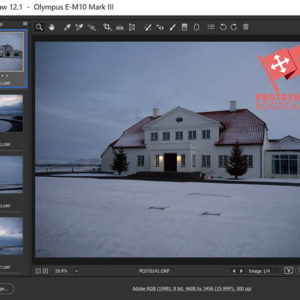
Step 3. Choose Filter > Camera Raw Filter. The Adobe Camera Raw interface opens.
On the right side of the ACR interface, you’ll see lots of little icon buttons to press and sliders to drag. We’ll make a few adjustments using the sliders.
Because this image is so dark, it might seem like increasing the Exposure will give the fix we need. If I drag the Exposure slider to the right, here’s the result.
Yes, the picture is now lighter and we can see more of the foliage and bridge detail, but we’ve lost detail in areas where there was already a lot of light coloured pixels. In particular, the sky is now completely blown out. So the problem with just increasing the exposure is that EVERYTHING has gotten lighter. This is not what we want.
Instead, I want to make changes to the shadows and dark areas of the image. So for this photo, I’ll start with the Shadows slider.
Step 4. Drag the Shadows slider to the right. The amount to drag will vary depending on the photograph. In this case, I’ve dragged to 100, which is the maximum. Larger values provide greater lightening of shadows.
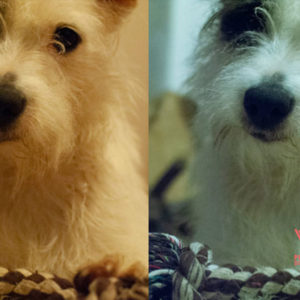
Step 5. Drag the Highlights slider to the left to darken the light pixels. In this photograph, darkening some of the light pixels improves the look of the sky. This is a typically Irish sky, a mixture of small blue patches, combined with light and dark clouds. Rain is never far away 🙂
There is already a big improvement overall just by moving those two sliders. The very dark areas are now lighter and we still have detail in the areas that were originally light.
We can use the Whites and Blacks sliders to make the image look more or less contrasty. This is just one of several ways to adjust contrast in Adobe Camera Raw. Using Whites and Blacks sliders is pretty much the same as using the Level adjustment in Photoshop.
Dragging the Whites slider to the right brightens the already light coloured pixels in the image, dragging to the left darkens the light colours. Dragging the Blacks slider to the right, lightens the dark pixels and dragging to the left darkens the dark area.
Step 6. For this image, I’m leaving the Whites slider at its default of 0. I do want to slightly lighten some of the dark pixels, so I dragged the Blacks slider to the right.
Clarity adds midtone contrast to your image. It gives the impression of a sharper image, although it doesn’t actually add any sharpening. It’s an easy way to adjust your image because all you need to do is drag to the right to add more midtone contrast. Increasing midtone contrast produces greater contrast in the midtones while tending to darken the shadows and lighten the highlights.
Increasing Saturation makes every colour look more colourful. This is a slider that needs to be used in moderation because it can make your photographs look a bit cartoony. You can also use Saturation to decrease colour, by dragging to the left.
Vibrance is like dusting your photo with magic pixie dust. It makes only dull colours more vibrant and colourful, and ignores the already vibrant colours.
Step 7. For the final adjustments, I’ve increased the Clarity to close to +30, I gave a little bit of a colour boost to the sky by slightly increasing Saturation and I added a final bit of oomph by dragging the Vibrance slider to the right to +10.
Step 8. A nice feature in ACR is the ability to see your before and after work side by side. Click on the small icon that looks like the letter Y in the bottom right under your photo. This will give you a side by side comparison. Below you can see the dramatic change achieved with just a couple of simple adjustments.
Step 9. The final step is simply to click OK. Your image opens again in Photoshop. You’ll also notice the smart filter applied in your layers panel. As long as you save your file as a .PSD, you can come back at ANY TIME and click on this filter and adjust your Camera Raw settings from where you last left it.
As with almost everything in Photoshop, there is more than one way to fix this kind of problem. And you could improve your photo using other slider combinations. Part of the fun is experimenting.
I hope you found this guide to Adobe Camera Raw useful. I would be so grateful if you would share it. Thank you! 🙂
Download a Free Photoshop Trial