Physical Address
304 North Cardinal St.
Dorchester Center, MA 02124
Physical Address
304 North Cardinal St.
Dorchester Center, MA 02124

Last Updated on September 3, 2020
Here’s a quick guide to saving selections, refining them and reusing them using the alpha channel in Photoshop.
Not always the first question a person asks when they’re learning Photoshop. But I’m glad you’ve asked 🙂
An alpha channel lets you save or store a selection that you’ve made so that you can use that selection again at a later time. This is a really useful, if underused function in Photoshop.
Let’s run through an example of making a selection and then turning it into an alpha channel. If you’d like to know lots more about how to make a selection, check out my guide to using all of the selection tools in Photoshop.
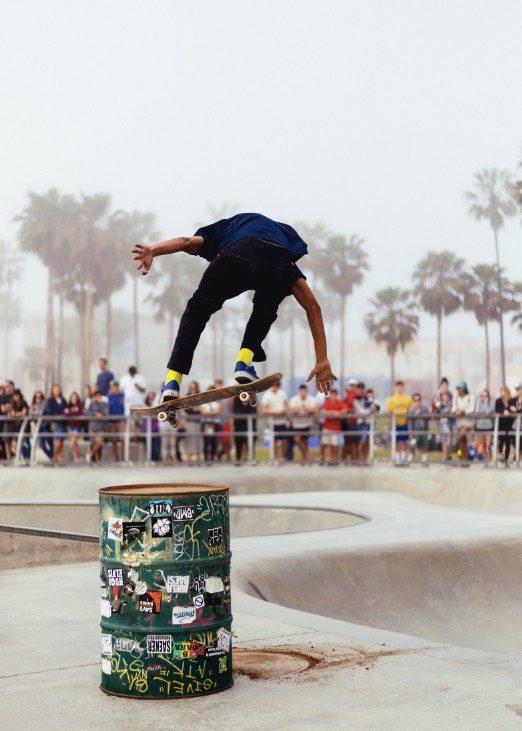
1. In Photoshop open an image that you want to make a selection in. I’m using this photo of a skateboarder by Andrew Pons which is free to download from Unsplash.
2. Zoom in so that you can clearly see all of whatever you’re selecting.
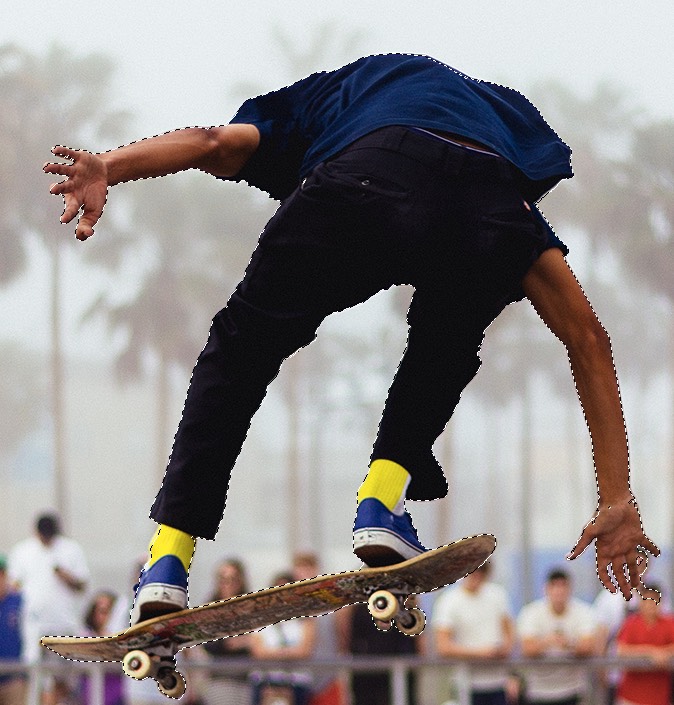
3. Use your favourite or the most appropriate selection tools to make a selection. For this particular example, I’ve used the Magic Wand.
I picked the Magic Wand because there are large blocks of similar colours in the areas I’m selecting and they’re easy to select with this tool.
By holding down Shift while clicking with the Magic Wand, you can add to the selection. If you make a mistake and add too much to the selection, hold down the Option (Mac) or Alt (Windows) key. As you can see below, I’ve selected all of the skater, but there are a few extra bits around his right hand that should not be included. For now, though we’ll leave it and come back to it in a moment.
4. Now that the selection is made, you can save it in case you need to use it again or if you want to refine it further using an alpha channel. Choose Select > Save Selection. This lets you convert your selection to an alpha channel.
5. Choose New for Channel and give your selection a name. (Mine’s called skater). Click OK.

At this stage, if you were happy with how your selection looks, you could continue about your business in Photoshop and come back later and choose Select > Load Selection and the exact shape of your selection will appear. However, I want to show you how to improve your saved selection.
6. Click on the Channels tab (usually in the Layers palette group) to view the new alpha channel. If you can’t see the Channels panel, you’ll find it under the menu Window > Channels.
(Optional tip) If the thumbnails in the Channels palette are very small, you might find it useful to increase their size by clicking on the Channels palette menu and choosing Palette Options. From there you can pick larger thumbnails.
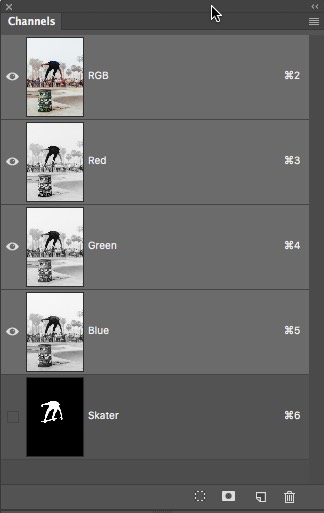
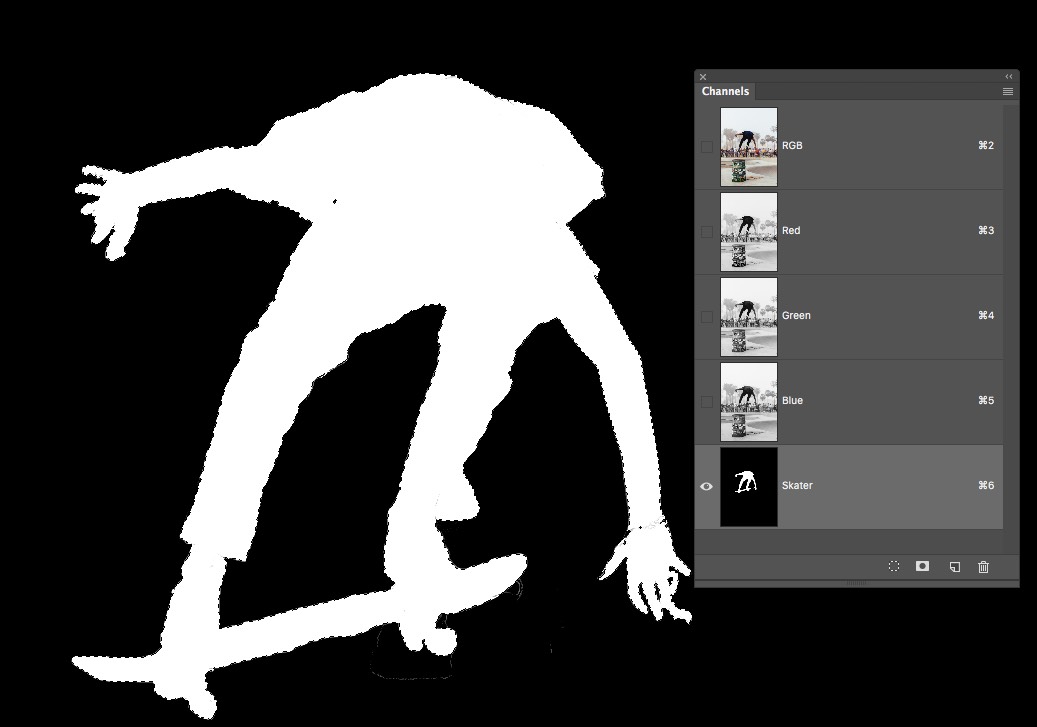
7. Click on the new channel (Skater) in the Channels palette. You now have a black and white view of the selection you made earlier. You can see where I made the mistake selecting around his right hand, but you can also see little black “islands” in various spots where the selection was missed.
8. Even though you have converted the selection to what is now a mask, you’ll see that the dancing ants still appear around the original selection. Press Cmd + D (Mac) orCtrl + D (Windows) to deselect.
At this point, you can refine your selection further.
1. With the alpha channel still selected, choose the Paintbrush tool from the toolbar. When working with an alpha channel, you will either paint in black or white or the shades of grey in-between. If you paint with a black Paintbrush, you are subtracting from the selection and if you paint with white you are adding to the selection. You can fill in any gaps this way.

2. Paint over the obvious bits of the selection that were missed out or over selected.
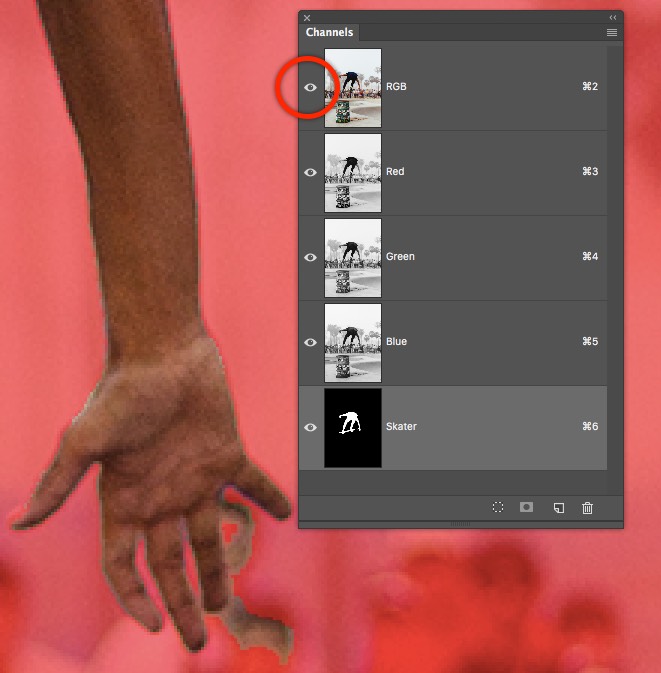
3. To make it easier to see exactly what you are selecting, click on the Visibility toggle eye icon beside the RGB channel at the top of the Channels panel. You will now be able to see your image and your selection at the same time. You will see a mask. The area that you have selected will look normal, while the area outside your selection will be covered with a red transparency. This red transparency is known as a rubylith and is used in traditional masking.
4. Continue to paint in black or white to add or subtract from your selection until you have refined it.

5. To convert the mask back to a selection click the Load Channel As Selection button at the bottom of the Channels palette.

6. Click on the Visibility toggle Eye icon beside the alpha channel you made, then click on the RGB channel at the top to switch back to a full-colour composite.
The alpha channel in the original image is saved when the file is saved. Once you store the selection as an alpha channel, you can reload it at any time or even load it into another image.
When you’re ready to use your selection again you can use the Load Selection function as follows:
1. Choose Select > Load Selection.
Specify the Source options in the Load Selection dialog box:Document: Chooses the name of the file with the selection you want to load.
Channel: Chooses the channel containing the selection you want to load, in this example it’s the alpha channel called Skater. You can save multiple selections in any Photoshop file.
Invert: Inverts the selection so previously non-selected areas will now be selected.
Select an Operation option to specify how to combine the selections if the image already has a selection:
New Selection: Adds the loaded selection.
Add To Selection: Adds the loaded selection to any existing selections in the image.
Subtract From Selection: Subtracts the loaded selection from existing selections in the image.
Intersect With Selection: Saves a selection from an area intersected by the loaded selection and existing selections in the image.
Note: If you are loading a saved selection from another image, make sure to open it. Also, make sure your destination image is active.
I hope you found this useful. I’d be super grateful if you would share it. Thank you!
Instructor
Hi I’m Jennifer.
I am an Adobe Education Trainer and have been teaching Photoshop, Illustrator and InDesign for over 15 years.
I also work as an illustrator and designer so as well as helping people learn Photoshop, I also use it everyday for my own work.
One of the best ways to improve your skills and speed up your workflow in Photoshop is to use keyboard shortcuts. This giant, printable cheat sheet shows all of the shortcuts for every tool in the toolbox.
Join over 1500 Photoshop beginners and improvers who have signed up to the Photoshop Bootcamp newsletter. Get Photoshop tips and tutorials delivered right to your inbox.
![]()