
How To Use Photoshop Tools
Just like an artist’s work table, the toolbar holds Photoshop tools. It is the long, narrow palette on the far left side of the work area contains the tools you’ll use to draw, paint, erase, and do tons of other things whilst working on your image. You can download a free trial of Photoshop here.
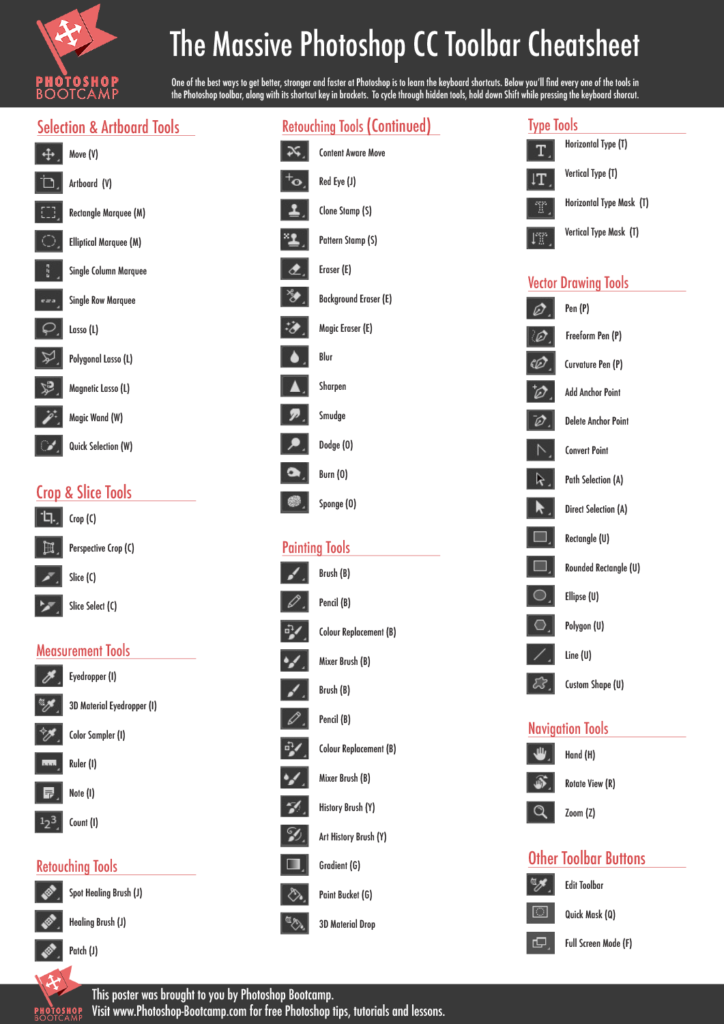
Let’s start off by taking a closer look at what’s actually in the toolbar. The tools can be broken into several distinct categories. This will help you find them when you know what kind of tool you need. The illustrations below show an overview of the toolbox, with each tool available and its shortcut key.
I strongly encourage you to start making a mental note of the shortcuts. It’s one of the best ways to speed up your workflow in Photoshop.
Selection and Crop Tools
Painting and Retouching Tools
Vector drawing and Type Tools
Navigation Tools
Color Selection
Quick Mask and Screen Mode
How to use Tools and the Toolbar in Photoshop
To select a tool, simply click on that tool in the Toolbar.
When you hover your mouse over any tool in the toolbar, a tooltip appears showing you the name of the tool and the tool’s keyboard shortcut. This is very handy when you forget what a certain tool looks like when you’re learning Photoshop.
It’s worth making a conscious effort to learn the shortcuts as it speeds up your work enormously. Some of the shortcuts are really easy to remember such as Z for the Zoom tool or E for the Eraser. So instead of clicking on the tool in the Toolbar, just press the letter on the keyboard. This will dramatically speed up your workflow as it lets you change tools without taking your hands off the keyboard.
DOWNLOAD FOR FREE
A Printable PDF Cheatsheet Of The
Photoshop Toolbar & Tools
ALL THE TOOLS, ALL THE SHORTCUTS
Sign up below to download a high-quality PDF poster showing all of the Photoshop CC tools and their shortcuts.
Hidden Tools
Wherever you see a little arrow on the bottom right of a tool in the Photoshop toolbar (or any Adobe application for that matter), it means there are other “hidden” tool choices. Hidden tools are accessed by clicking and holding on that tool. As you hold, a fly-out set of tools will appear giving you access to all of the hidden tools under that particular tool. In the example below, you can see that by clicking and holding on the Magic Wand tool, the hidden Quick selection Tool becomes available.
To quickly cycle through hidden tools, hold down the Shift key and tap the tool’s keyboard shortcut that appears in tooltips. For example, to cycle through the Brush, Pencil, Color Replacement and Mixer Brush tools, you would press B to select the first tool and then hold down Shift and press B again to move through that particular set of tools.
Moving The Toolbar
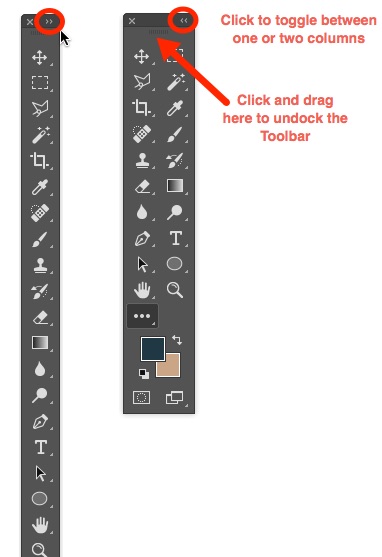
To change the Toolbar from a single column to a two-column panel, click once on the double arrow button in the top-right corner. To switch back again, simply click the double-arrow button again.
To float the Toolbar anywhere on your screen, drag it away from the left-hand screen edge. Drag it by clicking the tiny row of vertical dashes near its top. It is now a “floating” panel and you can drag it anywhere you want as you work.
To dock it back to the edge of the screen, drag the panel all the way to the edge until a blue vertical bar appears against the edge of the screen. The blue bar is an indication to let go and the panel will snap into place and is once again docked.
Picking Colors
Near the bottom of the Toolbar, you can see the Foreground and Background Color Swatches (sometimes called color chips). By default the foreground is black and the background is white. Photoshop uses the foreground color when you paint or fill an area with color. The background color is used as a second color when you create a gradient and when you erase parts of a locked Background layer amongst other things.
To change a color, click on its color swatch once to open the Color Picker. From here you can choose from millions of colors.
To swap your foreground and background colors, click the round double-headed arrow just above the foreground and background swatches or press X on the keyboard.
To set both color swatches back to their default factory setting of black and white, click the miniature swatches or press D.
The last two items on the Photoshop Toolbar are the Quick Mask mode and the Screen Mode Buttons.
The Photoshop Info Panel & Tools
Another useful panel that you can use when you’re learning about Photoshop tools is the Info panel. This gives further hints about how to use any particular tool.
Choose Window > Info if the Info panel is not already open. If you don’t see a tip at the bottom of the panel then go to the Info panel menu and choose Panel options, from there click on the checkbox for Show Tool Hints.
DOWNLOAD FOR FREE
A Printable PDF Cheatsheet Of The
Photoshop Toolbar & Tools
ALL THE TOOLS, ALL THE SHORTCUTS
Sign up below to download a high-quality PDF poster showing all of the Photoshop CC tools and their shortcuts.
