
When I show my class some retouching and repairing techniques, I usually get a couple of “oohs” and “ah”s when we look at the Content Aware Fill function in Photoshop. This is an extremely useful tool for photographers who want to quickly and easily remove something from a photograph without getting into using the stamp clone or healing and patch tools. If you want to learn how to just move something within an image without removing it - check out this tutorial. Otherwise, read on.
The Content Aware Fill in Photoshop works so quickly and does a fantastic job removing objects from a photograph and replacing them (very convincingly) with a fill that matches the rest of the photograph. Here’s how to use it.
How To Remove Any Object Using Content Aware Fill
1. Open your image in Photoshop.
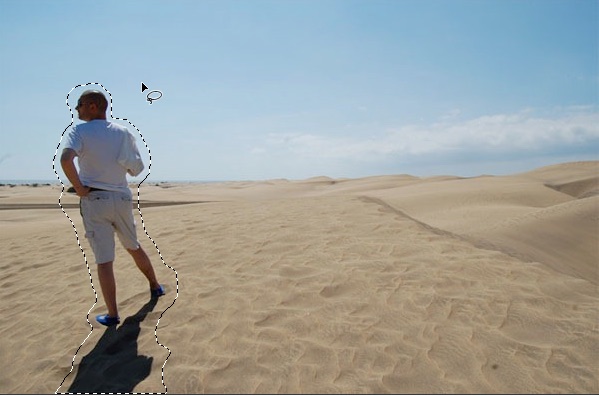
I’m using a photograph of my beloved husband in the sand dunes. For the purposes of demonstration, let’s say I want to remove him from the picture. Normally, I like having him in my pictures 🙂

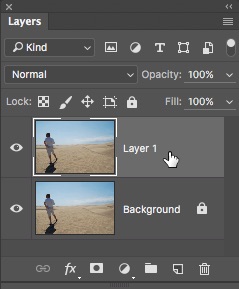
2. Whenever you’re retouching a photograph, it’s always a good idea to make changes on a separate layer just in case of accidents. It can also be useful for creating blending effects.
Press Ctrl + J (Windows) / Cmd + J (Mac) to duplicate your original layer. The original photo is now safe on the background and you can edit on the new layer.
In just a moment we’ll be using the Fill command to remove the contents of our selection. It’s important to note that the Fill command doesn’t sample all layers and it won’t work on an empty layer, so just be absolutely sure that you’ve selected the correct layer in the layers panel i.e. your new duplicate layer before you apply the fill.
3. Draw a selection around the object that you want to remove. For this picture, I used the Lasso Tool (L)
4. Choose Edit > Fill. In the Fill dialog box, choose Content-Aware from the Contents drop-down menu, and click OK.
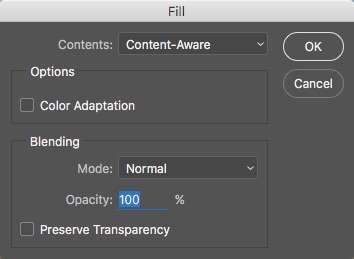
And then the magic happens! The selection changes to match the area around it and Photoshop generally does an excellent job at filling it in convincingly.

5. Press Ctrl + D (Windows) / Cmd + D (Mac) to deselect and that’s it. If you hadn’t seen the original image, it would be very hard to tell that there had been a person in the foreground.

You’ll definitely find there is a bit of trial and error with this tool, but when it works, it works really well. The special sauce that Photoshop uses to fill the selection is random and it changes every time you use the Fill command. So if it doesn’t work the first time, try Edit > Fill again and you’ll get a slightly different result.
Now, Go forth and remove stuff!
I hope you’ve found this Photoshop tutorial useful and I would be really grateful if you would share it. Thank you so much! 🙂
Get A Free Printable Photoshop Toolbar Cheatsheet
Subscribe now to get a free printable poster showing all of the Photoshop tools and their keyboard shortcut.

Hello!
My name is Jennifer Farley. I’m an illustrator, designer, author and design teacher based in Ireland. I’ve been teaching and working in the design field for over 15 years and I help people learn Adobe Photoshop, Lightroom, Illustrator and Graphic Design.
Photoshop Bootcamp is a growing collection of my Photoshop tutorials and lessons I’ve written for my students.
