Last Updated on February 23, 2024
The ability to manage a big pile of images efficiently is essential for creators who work digitally. In this quick guide, I’ll show you step-by-step how to create a simple action to resize images, and how to then use that action to batch resize multiple images in Photoshop.
Whether you’re an illustrator, designer or photographer, you’ve probably found that the process of re-sizing multiple images can be time-consuming. However, fear not, as you’ll learn a quick and efficient method to batch-resize your photos, illustrations, diagrams or ANY kind of images in super quick time with Adobe Photoshop.
What is Batch Resizing?
Batch resizing or bulk resizing, as the name suggests, involves adjusting the dimensions of a group of images simultaneously, saving you valuable time and effort. This technique is particularly handy when you need to shrink large image files for online sharing, social media, emailing, or specific project requirements.
To begin with, you’ll need Adobe Photoshop. You can download a free seven-day Photoshop trial if you need it, and you can work along with me.
Ok, let’s get started by creating an Action in Photoshop that we can reuse. For this example, I have a folder with 6 images and I want to resize images to 800 pixels width.
How To Make A Photoshop Action To Resize Image Files
| 1. Open Photoshop. Open one of the images you want to resize. Navigate to the Window menu and select “Actions“. The Actions Panel opens. | 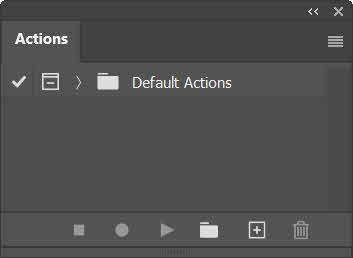 |
| 2. Create a new folder in the Actions Panel for organizing your actions by clicking on the Create New Set button at the bottom. Give it a name, such as “Image Resize”. | 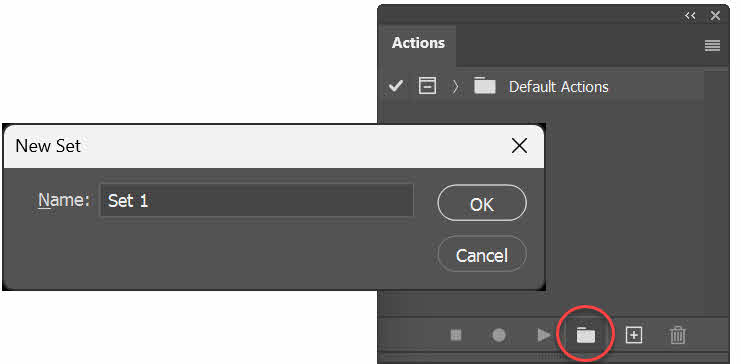 |
| 3. Click on the Create New Action button at the bottom. Name it something appropriate that you will recognise when you use the action again in the future. For example, I’ve called mine “800px Image Resize.” Press Record. We’re initially creating this action to record the steps you perform on just ONE image file and once it is created you can apply them to an entire batch or folder of images. | 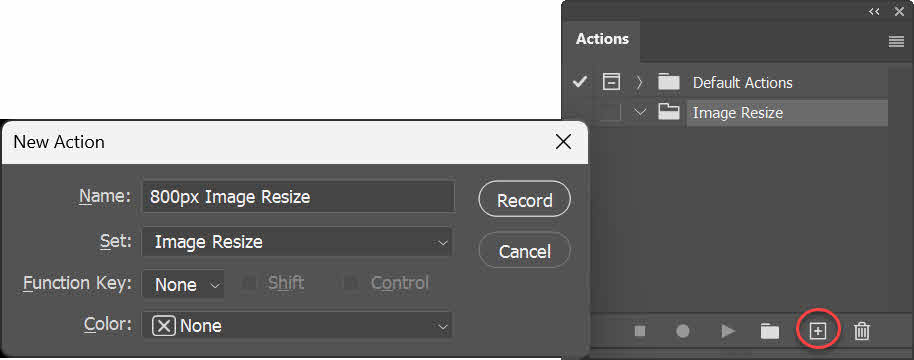 |
| 4. With the action recording enabled, choose Image > Image Size and set the Width to 800 pixels. You can choose other options such as the Resolution. In this case, I’m saving for the screen, so I can leave it at 72 Pixels/Inch. Another option to consider is Resample. Because we’re making the image smaller, choose Preserve Details 2.0 or leave it on Automatic. Click OK. Photoshop will record this step within your action. | 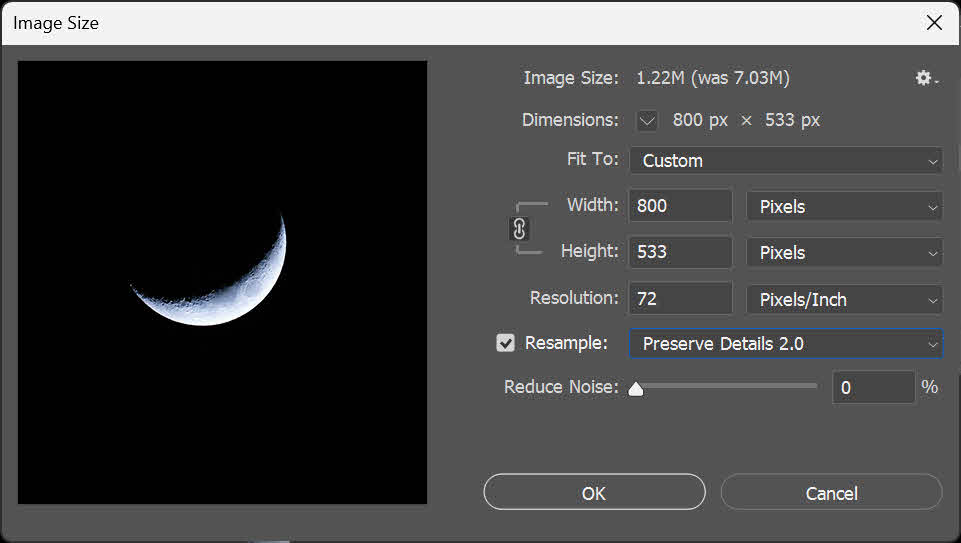 |
| 5. Once you’ve adjusted the size, save the image by navigating to File > Save As. Choose your desired file format in the drop down “Save as Type”. There is a pile of file formats available. JPEG is a file type commonly used for sharing photographic type images, while PNG is commonly used for images with fewer colours such as logos or for images with areas of transparency.. Select the destination folder, and adjust the image quality settings if necessary. This will affect the file size of your images. | 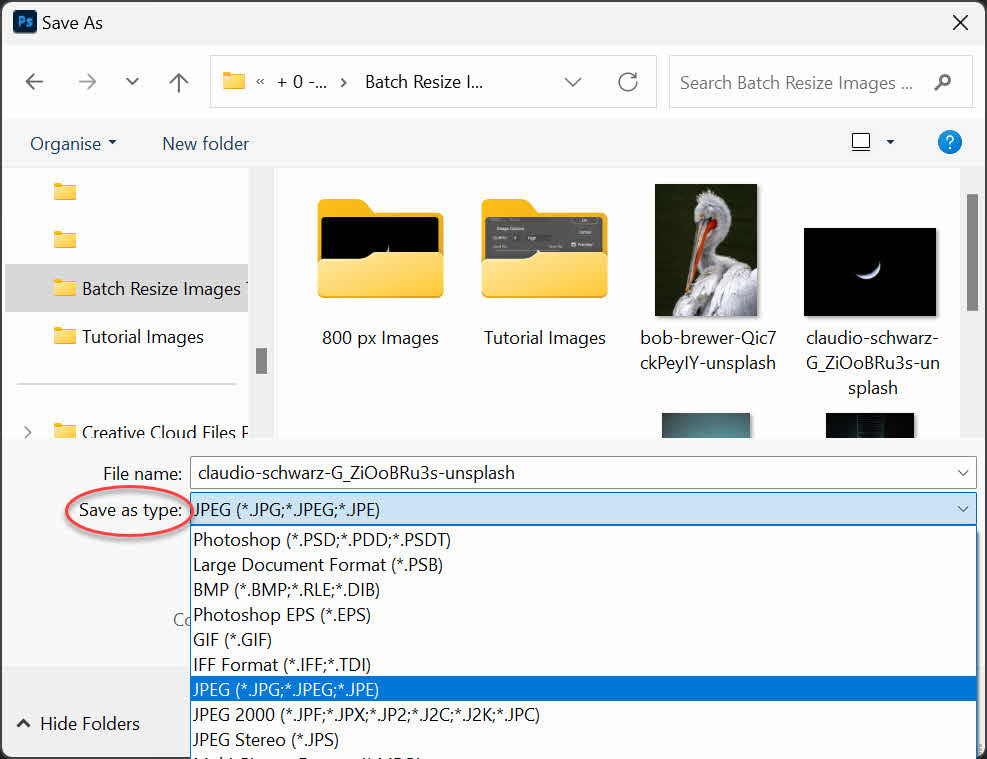 |
| 6. After saving the resized image, stop recording the action by clicking on the Stop Recording button at the bottom of the Actions Panel. And that is your action completed! This action will now resize any image to 800 pixels wide and save it in your specified format and location. | 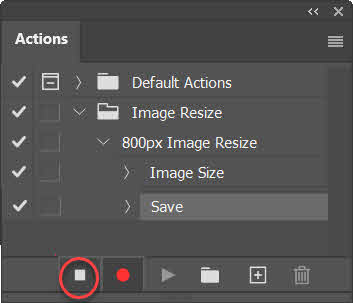 |
Automating the Process of Resizing Multiple Images in Photoshop
Now that you’ve created the action, it’s time to use it! You can automate the batch resizing process for all the images in the folder. Follow these steps:
| 1. In Photoshop, go to File > Automate > Batch. The Batch dialog box opens. | |
| 2. Choose the action folder Set you created earlier and the specific Action within it (e.g. “800px Image Resize”). Select the Source of your images, whether it’s individual files or an entire folder containing your photos. Under Destination specify where you want the resized images to be saved. You can create a new folder if necessary. Under File Naming, go for a naming convention that suits your preferences, ensuring each file is easily identifiable. In this example, because I am saving the files into the folder with 800px images, I am going with the default naming of Document Name and extension. | 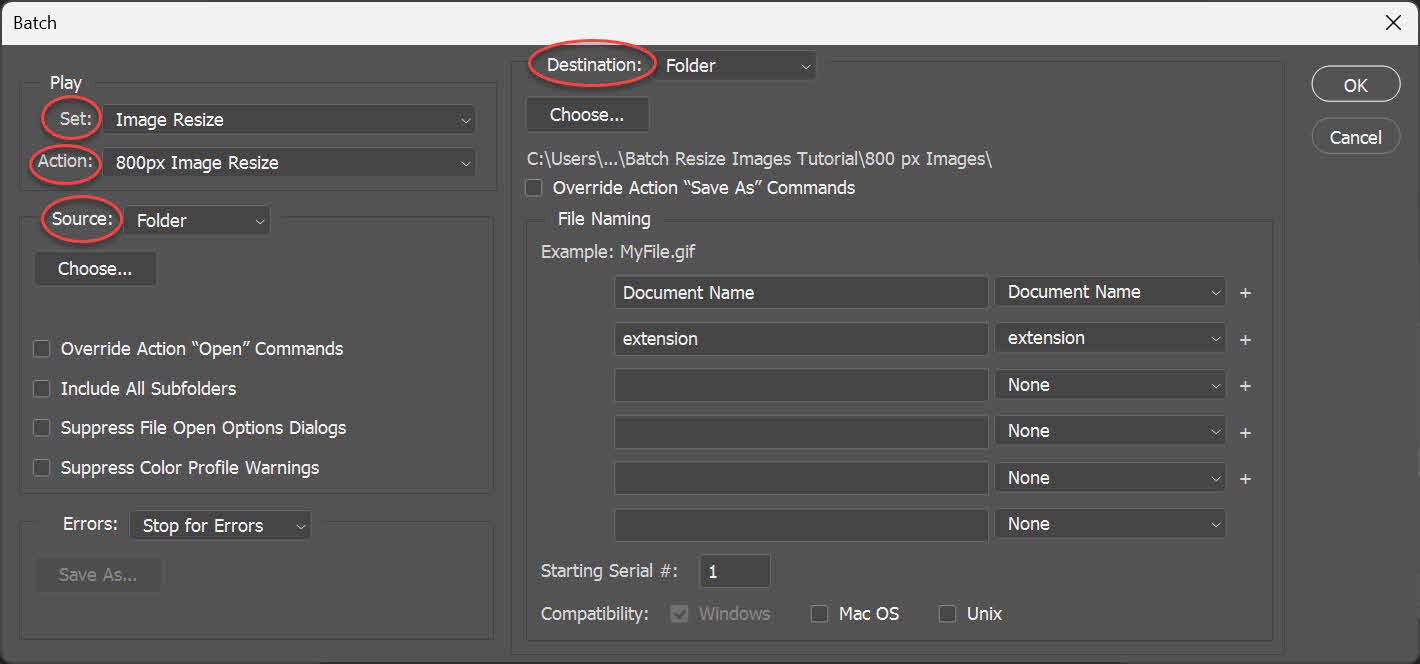 |
| 4. Once you’ve configured the settings, start the batch process by clicking OK. Photoshop will now open one image at a time, resize it to the dimensions you specified, save it in the folder you specified, and then close the file. Ta Da! |
Rinse and Repeat
Now you know how to resize to 800px, you can make more actions for a variety of sizes that you may need.
I frequently need to resize my images from high-resolution print files, to smaller low-res images for my portfolio. I set image sizes for my portfolio site around 1000 pixels wide and images for social media at 1200 pixels wide.
You make the actions once and then you can reuse them forever.
Super Quick Resizing – Done and Dusted in Photoshop
In just a few simple steps, you’ve learned how to batch resize images in Adobe Photoshop. You can imagine what a pain in the bum this would be if you had to do this to every single image individually.
This efficient technique will save you time and streamline your workflow, allowing you to focus on what matters most, designing, illustrating making your art, or photo editing.
The next time you’re inundated with a multitude of photos, remember this handy trick to resize them in a matter of minutes.
Photo Credits: Thank you to the following photographers for sharing their photos on Unsplash.
Bird Photo by Bob Brewer on Unsplash
Fish Photo by NEOM on Unsplash
Escalator Photo by Ruslan Gibadullin on Unsplash
Diver Photo by NEOM on Unsplash
Moon Photo by Claudio Schwarz on Unsplash
Car Photo by Patrik Storm (Alstra Pictures) on Unsplash


