Physical Address
304 North Cardinal St.
Dorchester Center, MA 02124
Physical Address
304 North Cardinal St.
Dorchester Center, MA 02124
A color cast on a photograph is simply a tint of a particular colour. Photos with a blue color cast feel cold, while those with a yellow-y tint have a warm sometimes sickly feel. Generally, color casts are unwanted, but they are really easy to fix in Adobe Camera Raw. Here are three easy ways to fix a color cast in Photoshop with the Adobe Camera Raw filter.
If you need it, you can get a free Photoshop trial (including Camera Raw) here.
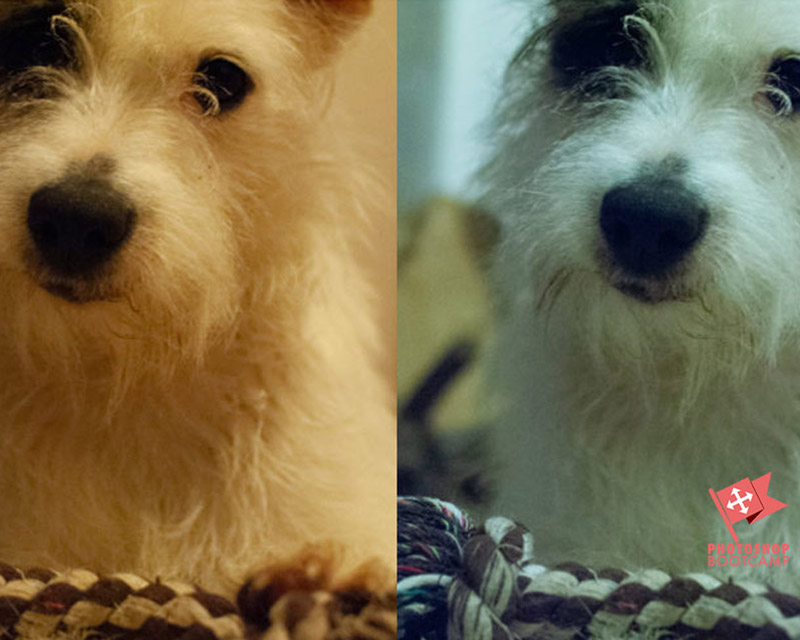
For the following examples, I’m using a pic of one of our dogs, Otto. I took the photo indoors with a black background. As you can see it has a strong blue cast, he’s not actually blue 🙂
Otto With Blue Color Cast
This is the easiest and quickest fix for color casts.
If you want to take more control over how you fix the color cast, you can use the Temperature and Tint sliders. I’m going to use a different photo. This time the picture was taken indoors but it has a very strong yellow tint.
Otto With Yellow Color Cast
1. Open your photograph in either Camera Raw or the Camera Raw filter. If your image is too warm or yellow looking, drag the slider to the left to cool it down. Drag the Temperature slider to the right to warm the image.
This removes the yellow-y look, but now the picture is looking a little bit green, so I’ll use the Tint slider next.
2. Looking at the Tint slider, you can see how it ranges from green on the left to neutral in the middle, to magenta on the right. As I drag slowly towards magenta, the green hue is reduced.
Another quick and easy way to fix a color cast is to use the Eyedropper tool in Camera Raw to pick up the color of something that SHOULD be a neutral color. The ideal would be a gray balance card, but obviously that’s not going to happen in most candid photographs.
Once again I’m using a photo of our beloved Otto. Again taken indoors with a very strong yellow-orange colour cast.
1. Select the Eyedropper tool inside Camera Raw, or press I on the keyboard to select it.
2. Click once on an area of neutral color - a mid gray is usually good. Almost instantly, you’ll see the color cast disappears.
Whichever of these three methods you use, click Done to close Camera Raw with the changes to your photo. Click Open Object if you want to do more work on it in Photoshop, or click Cancel if you want to close Camera Raw with none of the changes applied.
If you’d like to learn more, I have written some Beginner’s Camera Raw Tutorials here.
I hope you found this useful. Please share it with others, thanks a million! 🙂
Subscribe now to get a free printable poster showing all of the Photoshop tools and their keyboard shortcut.